Containers
Docker, Podman, Kubernetes, and OpenShift
Containers
Docker and Podman commands
Buildah
Basic howto for building a container image with Buildah.
This example set will build the GNU hello application on a Fedora image. To follow along, download the hello source from here: http://mirrors.kernel.org/gnu/hello/
Start with a base image.
buildah from fedora:latest
Get a list of buildah containers
buildah containers

Set a container variable. (Reduces typing, great for scripting)
container=fedora-working-container
Copy the source to the container
buildah copy $container hello-2.14.tar.gz /tmp/
Install required packages into the container, then clear the package cache.
buildah run $container dnf install -y gzip tar gcc make automake
buildah run $container dnf clean all
Untar the source to /opt
buildah run $contaner tar zxvf /tmp/hello-2.12.tar.gz -C /opt
Set the working directory
buildah config --workingdir /opt/hello-2.12 $container
Build the software as required.
buildah run $container ./configure
buildah run $container autoconf
buildah run $container make
buildah run $container cp hello /usr/local/bin
Check the build and that the binary is in the correct location.
buildah run $container hello --version
Add an ENTRYPOINT
buildah config --entrypoint /usr/local/bin/hello $container
Commit the build container to an image.
buildah commit --format docker $container hello:latest
Run the image.
podman run hello
Remove the build directory
buildah rm $container
Dockerfile and container images
Building container images using a Dockerfile.
Here's a Dockerfile example that runs a simple nmap.
Dockerfile
# Start with a base image
FROM redhat/ubi8
# Maintainer information
LABEL org.opencontainers.image.authors="mail@clusterapps.com"
LABEL description="Simple Network scan"

# Run commands to build the container
# Do as much with the fewest RUN lines
RUN dnf -y update && \
dnf -y install \
nmap iproute procps-ng && \
bash && \
dnf clean all

# Entrypoint is the command that run when the ccontainer starts
ENTRYPOINT ["/usr/bin/nmap"]
#  The arguments for the entrypoint
CMD ["-sn", "192.168.252.0/24"]
What to know about the file:
- FROM
The FROM is the base used for the new image.
- LABEL
LABEL adds metadata to an image
- RUN
The run command is that steps taken to build the image. Each RUN command will build an additional layer to the image. It is best to use the fewest RUN entries as possible.
- ENTRYPOINT
This is the what the container will run when it first starts. This might be a binary or a script that starts jobs or services.
- CMD
These are the arguments to the ENTRYPOINT. The CMD can be overwritten on the command line.
See https://docs.docker.com/engine/reference/builder/ for more detais.
Build, run, tag, and push
Build with a tag.
podman build -t nmap:latest .
Run the image with the built in CMD.
podman run nmap
Run with different CMD
podman run nmap -sT -Pn -p80 192.168.252.210
Tag for a repository
podman tag localhost/nmap:latest quay.io/clearyme/nmap:latest
Push to repository
podman push quay.io/clearyme/nmap:latest
Podman
Basics
Registry file: /etc/containers/registries.conf
Login to a registry
podman login registry.access.redhat.com
Search for images
podman search mariadb
Inspect images without downloading
skopeo inspect docker://registry.access.redhat.com/rhscl/mariadb-102-rhel7
Download images
podman pull registry.access.redhat.com/rhscl/mariadb-102-rhel7
List local images
podman images
Start a container based on an image ID. Get the ID from docker images.
podman run --name apache bitnami/apache
control-c will stop the container for all of the run commands.
Start an image based on a tag detached
podman run -d --name apache bitnami/apache:2.4.52
Start the an app with port forwarding
podman run -it -p 8080:8080 bitnami/apache
Get running images
podman ps
Get all images
podman ps -all
Enter container in interactive shell
podman exec -it container-name /bin/bash
Commit changes to running image
podman commit container-name image-name
Check container logs
podman logs <Container Name>
podman logs -f <Container Name> # Follow the logs
podman logs --tail=25 <Container Name> # Last n lines
Stop a running image. The container ID will be in the podman ps output.
podman kill <Container ID>
Remove an image. The container ID will be in the podman ps output.
podman rm <Container ID>
Remove all images.
podman rmi --all --force
Export image
podman save image-name > /path/to/image.tar
Restore/Load image
podman load -i /path/to/image.tar
Parameters and Volumes
Create a container mount point
sudo mkdir /srv/mariadb
sudo chown -R 27:27 /srv/mariadb # UID found in podman inspect
sudo semanage fcontext -a -t container_file_t "/srv/mariadb(/.*)"
sudo restorecon -Rv /srv/mariadb
Run image
-d detached
-e per variable
-p local_port:container_port
-v local/path:/path/in/pod
podman run -d -e MYSQL_USER=user \
-e MYSQL_PASSWORD=pass -e MYSQL_DATABASE=db \
-p 33306:3306 rhscl/mariadb-102-rhel7 \
-v /srv/mariadb:/var/lib/mysql:Z # :Z isn't needed if SELinux manually configured
Pods
Create a pod for rootless containers with a specific name and map ports needed. This example creates a Wordpress pod with a dedicated MySQL database using the Bitnami Wordpress image and a MySQL image from Red Hat.
Create a storage area.
sudo mkdir /srv/pods/wordpress/database
sudo mkdir /srv/pods/wordpress/sitedata
sudo chown -R poduser:poduser /srv/pods/wordpress # Host user running the pod
sudo semanage fcontext -a -t container_file_t "/srv/pods/wordpress(/.*)"
sudo restorecon -Rv /srv/pods/wordpress
Create the pod with port maps for 8443.
podman pod create --name press -p 8443:8443
Deploy the MySQL container
podman run -d --pod press --name mysql \
-e MYSQL_ROOT_PASSWORD=ThereIsAWordHere \
-e MYSQL_USER=wordpress \
-e MYSQL_PASSWORD=presswords \
-e MYSQL_DATABASE=wordpress \
-v /machines/pods/wordpress/database:/var/lib/mysql:Z \
mysql-80-rhel7
Deploy the wordpress container.
podman run -d --name words --pod press \
-e WORDPRESS_DATABASE_HOST=press \
-e WORDPRESS_DATABASE_USER=wordpress \
-e WORDPRESS_DATABASE_NAME=wordpress \
-e WORDPRESS_DATABASE_USER=wordpress \
-e WORDPRESS_DATABASE_PORT_NUMBER=3306 \
-e WORDPRESS_DATABASE_PASSWORD=presswords \
-v /machines/pods/wordpress/site:/bitnami/wordpress:Z \
bitnami/wordpress
Log in to Wordpress at https://hostname:8443
Systemd
Create system .service files.
To create systemd files for the above Wordpress pod:
podman generate systemd --files --name press
Creates: container-mysql.service container-words.service pod-press.service
Copy the generated file to the user's systemd directory and reload the deamons.
 cp * ~/.config/systemd/user/
 systemctl --user daemon-reload
Enable the service at boot time
systemctl --user enable pod-press.service
Pod scripts
Here are a few quick scripts to get pods up and running quickly on Podman.
Gitea
Gitea is a self-hosted git server.
podman pod create --name gitea -p3000:3000 -p 2222:22
podman run -d --pod gitea --name gitea_db -e POSTGRES_PASSWORD=gitea -e POSTGRES_USER=gitea -e POSTGRES_DB=gitea -v /srv/gitea/pgdata:/var/lib/postgresql/data:Z docker.io/library/postgres
podman run -d --pod gitea --name gitea_srv -e USER_ID=1000 -e USER_GID=1000 -e DB_TYPE=postgres -e DB_HOST=gitea:5432 -e DB_NAME=gitea -e DB_PASSWD=gitea -e DB_USER=gitea -v /srv/gitea/data:/data:Z docker.io/gitea/gitea:latest
Wiki.js
export DATA=$PWD
export PASSWD=zo03gaeCi1
mkdir -p $DATA/wiki/pgdata
mkdir -p $DATA/wiki/data
chown -R 1000:1000
podman pod create --name wiki -p 3001:3000
podman run -d --pod wiki --name wiki_db -e POSTGRES_PASSWORD=$PASSWD -e POSTGRES_USER=wiki -e POSTGRES_DB=wiki -v $DATA/wiki/pgdata:/var/lib/postgresql/data:Z docker.io/library/postgres
podman run -d --pod wiki --name wiki_srv -e DB_TYPE=postgres -e DB_HOST=wiki -e DB_PORT=5432 -e DB_USER=wiki -e DB_PASS=$PASSWD -e DB_NAME=wiki -v $DATA/wiki/data:/wiki/data:Z ghcr.io/requarks/wiki:2
MediaWiki
#!/bin/bash
export DATA=$PWD
mkdir -p $DATA/wiki/mediawiki
mkdir -p $DATA/wiki/mariadb
podman pod create --name wiki -p 8888:8080 -p 8889:8443
podman run -d --name mariadb --pod wiki \
  -e MARIADB_ROOT_PASSWORD=aeneinei9Wai \
  -e MARIADB_USER=wikiuser \
  -e MARIADB_PASSWORD=ieshuB7Oozie \
  -e MARIADB_DATABASE=wiki \
  -v $DATA/wiki/mariadb:/bitnami/mariadb:Z \
  docker.io/bitnami/mariadb
podman run -d --name mediawiki --pod wiki \
  -e MEDIAWIKI_DATABASE_HOST=wiki \
  -e MEDIAWIKI_DATABASE_USER=wikiuser \
  -e MEDIAWIKI_DATABASE_PASSWORD=ieshuB7Oozie \
  -e MEDIAWIKI_DATABASE_NAME=wiki \
  -e MEDIAWIKI_HOST="thefed.manor.one" \
  -e MEDIAWIKI_EXTERNAL_HTTP_PORT_NUMBER=8888 \
  -v $DATA/wiki/mediawiki:/bitnami/mediawiki:Z \
  docker.io/bitnami/mediawiki:latest
Kubernetes
Kubernetes : Minikube on CentOS 7
Deploy Kubernetes on a developer's workstation.
This example is on CentOS 7with KVM. It is a VM. To follow along, you'll need metal or nested KVM.
It can be used to develop applications locally and then publish them to OpenShift, GKE or even Azure AKS.
Install the required packages and start libvirt
yum -y install qemu-kvm libvirt libvirt-daemon-kvm
systemctl enable --now libvirtd
Setup the repo for Kubernetes.
cat <<'EOF' > /etc/yum.repos.d/kubernetes.repo
[kubernetes]
name=Kubernetes
baseurl=https://packages.cloud.google.com/yum/repos/kubernetes-el7-$basearch
enabled=1
gpgcheck=1
repo_gpgcheck=1
gpgkey=https://packages.cloud.google.com/yum/doc/yum-key.gpg https://packages.cloud.google.com/yum/doc/rpm-package-key.gpg
EOF
Install Kubectl
yum -y install kubectlDownload the minikube binary and docker machine driver
wget https://storage.googleapis.com/minikube/releases/latest/minikube-linux-amd64 -O minikube
wget https://storage.googleapis.com/minikube/releases/latest/docker-machine-driver-kvm2
chmod 755 minikube docker-machine-driver-kvm2
mv minikube docker-machine-driver-kvm2 /usr/local/bin/
Run a quick minikube check to make sure it's working.
minikube version minikube version: v1.0.1
Run a kubectl check
kubectl -o json{
"clientVersion": {
"major": "1",
"minor": "14",
"gitVersion": "v1.14.1",
"gitCommit": "b7394102d6ef778017f2ca4046abbaa23b88c290",
"gitTreeState": "clean",
"buildDate": "2019-04-08T17:11:31Z",
"goVersion": "go1.12.1",
"compiler": "gc",
"platform": "linux/amd64"
}
}Start minikube
minikube start --vm-driver kvm2 After the the start command runs, check the status
minikube status You should see out put like this.
host: Running
kubelet: Running
apiserver: Running
kubectl: Correctly Configured: pointing to minikube-vm at 192.168.39.33
Setup the environment
minikube docker-env Output will look like this:
Kubernetes master is running at https://192.168.39.33:8443
KubeDNS is running at https://192.168.39.33:8443/api/v1/namespaces/kube-system/services/kube-dns:dns/proxy
Log into the minikube
minikube ssh Check the docker status
docker ps At this point you are in a normal VM shell. All tools work as expected.
To stop minikube.
minikube stopTo remove minikube, do like follows
minikube delete
Istio: Install
Setup and Configure
Download Istio by running the following command:
curl -L https://istio.io/downloadIstio | sh -
Move to the Istio package directory. For example, if the package is istio-1.11.2:
cd istio-1.14.1
Add the istioctl client tool to the PATH for your workstation.
export PATH=$PWD/bin:$PATH
Validate if the cluster meets Istio install requirements by running the precheck:
istioctl x precheck
Output should look simalar to:
✔ No issues found when checking the cluster.
Istio is safe to install or upgrade!
Install and Adding Integration
- Istio
istioctl install
- Prometheus and Grafana
kubectl apply -f samples/addons/prometheus.yaml
kubectl apply -f samples/addons/grafana.yaml
- Jaeger
kubectl apply -f samples/addons/jaeger.yaml
- Kiali
kubectl apply -f samples/addons/kiali.yaml
Dashboards
istioctl dashboard <service>
Where <service> is one of:
- prometheus
- grafana
- jaeger
- kaili
Gateway
Install the Gateway
kubectl create namespace istio-ingress
helm install istio-ingress istio/gateway -n istio-ingress
Operator Framework
Operator SDK
Download the release binary
Set platform information:
export ARCH=$(case $(uname -m) in x86_64) echo -n amd64 ;; aarch64) echo -n arm64 ;; *) echo -n $(uname -m) ;; esac)
export OS=$(uname | awk '{print tolower($0)}')
Download the binary for your platform:
export OPERATOR_SDK_DL_URL=https://github.com/operator-framework/operator-sdk/releases/download/v1.22.2
curl -LO ${OPERATOR_SDK_DL_URL}/operator-sdk_${OS}_${ARCH}
Verify the downloaded binary
Import the operator-sdk release GPG key from keyserver.ubuntu.com:
gpg --keyserver keyserver.ubuntu.com --recv-keys 052996E2A20B5C7E
Verify the signature:
curl -LO ${OPERATOR_SDK_DL_URL}/checksums.txt
curl -LO ${OPERATOR_SDK_DL_URL}/checksums.txt.asc
gpg -u "Operator SDK (release) <cncf-operator-sdk@cncf.io>" --verify checksums.txt.asc
You should see something similar:
gpg: assuming signed data in 'checksums.txt'
gpg: Signature made Fri 30 Oct 2020 12:15:15 PM PDT
gpg:                using RSA key ADE83605E945FA5A1BD8639C59E5B4762496218
gpg: Good signature from "Operator SDK (release) <cncf-operator-sdk@cncf.io>" [ultimate]
Make sure the checksums match:
grep operator-sdk_${OS}_${ARCH} checksums.txt | sha256sum -c -
You should see something similar to the following:
operator-sdk_linux_amd64: OK
Install the release binary in your PATH
chmod +x operator-sdk_${OS}_${ARCH} && sudo mv operator-sdk_${OS}_${ARCH} /usr/local/bin/operator-sdk
Bash completion
operator-sdk completion bash > /etc/bash_completion.d/operator-sdk
Install OLM
operator-sdk olm install
Operators
Prometheus
Clone the operator from Github
git clone https://github.com/prometheus-operator/kube-prometheus.git
cd kube-prometheus
Create the namespace and CRDs, and then wait for them to be availble before creating the remaining resources
kubectl create -f manifests/setup
Wait until the "servicemonitors" CRD is created. The message "No resources found" means success in this context.
until kubectl get servicemonitors --all-namespaces ; do date; sleep 1; echo ""; done
Deploy the rest of the operator manifests
kubectl create -f manifests/
OpenShift
RHCA - EX180/EX280
Red Hat Certified Specialist in Containers and Kubernetes
Notes, tips and tricks for the EX180 and EX280 exams.
Podman host setup
dnf module install container-toolsdnf install -y buildahPodman basics
Registry file: /etc/containers/registries.conf
Login to a registry
podman login registry.access.redhat.comSearch for images
podman search mariadbInspect images without downloading
skopeo inspect docker://registry.access.redhat.com/rhscl/mariadb-102-rhel7Download images
podman pull registry.access.redhat.com/rhscl/mariadb-102-rhel7List images
podman imagesInspect images. *Useful for locating config.user
podman inspect registry.access.redhat.com/rhscl/mariadb-102-rhel7:latestConfigure container volume path
sudo mkdir /srv/mariadb
sudo chown -R 27:27 /srv/mariadb # UID found in podman inspect
sudo semanage fcontext -a -t container_file_t "/srv/mariadb(/.*)"
sudo restorecon -Rv /srv/mariadb
Run image
-d detached
-e per variable
-p local_port:container_port
-v local/path:/path/in/pod
podman run -d -e MYSQL_USER=user \
-e MYSQL_PASSWORD=pass -e MYSQL_DATABASE=db \
-p 33306:3306  \
-v /srv/mariadb:/var/lib/mysql:Z \ # :Z isn't needed if SELinux manually configured
rhscl/mariadb-102-rhel7
Basic pod status and names
podman ps
Enter container in interactive shell
podman exec -it container-name /bin/bashCommit changes to running image
podman commit container-name image-nameExport image
podman save image-name > /path/to/image.tarRemove images
podman rmi image-name --forceRestore/Load image
podman load -i /path/to/image.tarDockerfile Basics
Container for scanning a network.
# Start with a base image
FROM registry.access.redhat.com/ubi8
# Maintainer information
MAINTAINER ClusterApps <mail@clusterapps.com>
# Run commands to build the container
# Do as much with the fewest RUN lines
RUN yum --assumeyes update && \
yum --assumeyes install \
nmap iproute procps-ng && \
bash && \
yum clean all
# Entrypoint is the command that run when the ccontainer starts
ENTRYPOINT ["/usr/bin/nmap"]
#  The arguments for the entrypoint
CMD ["-sn", "192.168.252.0/24"]
Build the image with a tag
podman build -t notes180 .List images
podman imagesRun the image
podman run localhost/notes180OpenShift Basics
Setup oc completion
source <(oc completion bash)Create a new project
oc new-project nginxCreate a new application based on an image
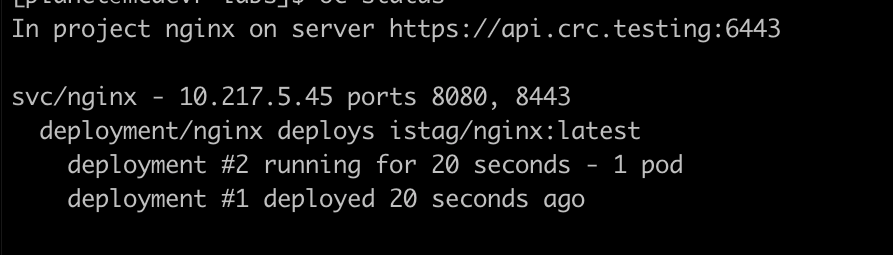
oc new-app bitnami/nginxBasic information about the project
oc status
Get more detailed information about the project
oc get all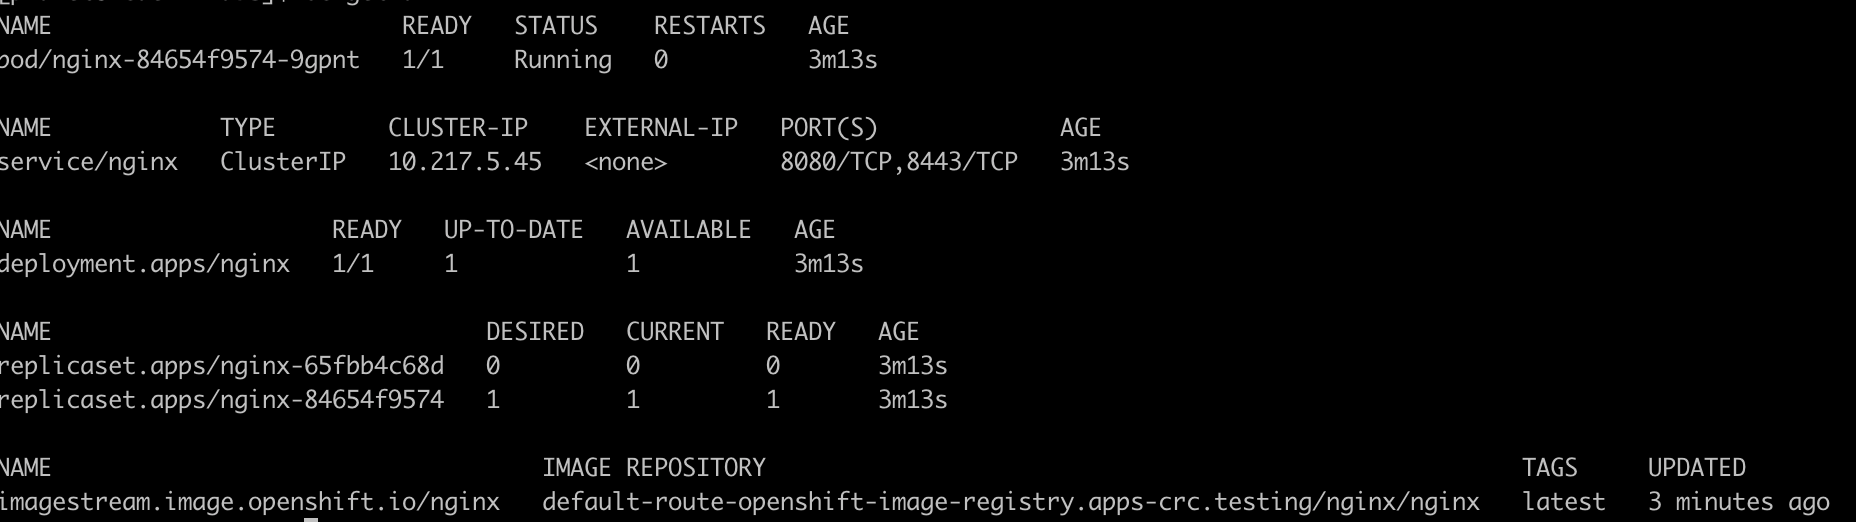
Get full details about a pod
oc describe pod/nginx-84654f9574-9gpntGet full details about a deployment
oc describe deployment.apps/nginxApplication deployments
Generate a YAML file to use as a base.
oc create deployment nginx --image=bitnami/nginx --dry-run=client -o yaml > newapp.ymlCreate a temporary deployment using the YAML file,
oc create -f newapp.ymlCreate the service by exposing the deployment
# dry run to add to YAML file
oc expose deployment --port=8080 --dry-run=client nginx -o yaml >> newapp.yml
# run to create the service
oc expose deployment --port=8080 nginx
Expose the service
oc expose svc nginx --dry-run=client -o yaml >> newapp.ymlNew app with parameters, as a deployment-config, and with labels (app=database)
oc new-app --name mdb -l app=database -e MYSQL_USER=dbuser -e MYSQL_PASSWORD=SuperAwesomePassword -e MYSQL_DATABASE=dbname bitnami/mysql --as-deployment-config
Delete the temporary application
oc delete all --allEdit the YAML file and break up the sections into proper YAML.
Add --- at the beginning of a section
Add ... at the end of a section.
The new nginx app YAML file.
---
apiVersion: apps/v1
kind: Deployment
metadata:
creationTimestamp: null
labels:
app: nginx
name: nginx
spec:
replicas: 1
selector:
matchLabels:
app: nginx
strategy: {}
template:
metadata:
creationTimestamp: null
labels:
app: nginx
spec:
containers:
- image: bitnami/nginx
name: nginx
resources: {}
status: {}
...
apiVersion: v1
kind: Service
metadata:
creationTimestamp: null
labels:
app: nginx
name: nginx
spec:
ports:
- port: 8080
protocol: TCP
targetPort: 8080
selector:
app: nginx
status:
loadBalancer: {}
...
apiVersion: route.openshift.io/v1
kind: Route
metadata:
creationTimestamp: null
labels:
app: nginx
name: nginx
spec:
port:
targetPort: 8080
to:
kind: ""
name: nginx
weight: null
status: {}
...
Delete API resources defined by a YAML file.
oc delete -f newapp.ymlUsing Templates
Get a list of templates
oc get templates -n openshiftGet template details
Review the parameters section for a list of environment variables.
oc describe template -n openshift mariadb-persistentCreate a new application from a template
oc new-app --template=mariadb-persistent \
-p MYSQL_USER=jack -p MYSQL_PASSWORD=password \
-p MYSQL_DATABASE=jack
Check the status of the deployment.
oc get all
oc describe pod/mariadb-1-qlvrj
Source 2 Image
Gety a list of templates and streams
oc new-app -LDeploy a new app from a git repo
oc new-app php~https://github.com/clusterapps/simpleapp.gitWatch the app get built
oc logs -f buildconfig/simpleappReview the deployment with oc get all
NAME                            READY   STATUS      RESTARTS   AGE
pod/mariadb-1-deploy            0/1     Completed   0          16m
pod/mariadb-1-qlvrj             1/1     Running     0          16m
pod/simpleapp-1-build           0/1     Completed   0          2m10s
pod/simpleapp-fb5554fd9-4kgnb   1/1     Running     0          89s
NAME                              DESIRED   CURRENT   READY   AGE
replicationcontroller/mariadb-1   1         1         1       16m
NAME                TYPE        CLUSTER-IP     EXTERNAL-IP   PORT(S)             AGE
service/mariadb     ClusterIP   10.217.5.246   <none>        3306/TCP            16m
service/simpleapp   ClusterIP   10.217.4.16    <none>        8080/TCP,8443/TCP   2m11s
NAME                        READY   UP-TO-DATE   AVAILABLE   AGE
deployment.apps/simpleapp   1/1     1            1           2m11s
NAME                                   DESIRED   CURRENT   READY   AGE
replicaset.apps/simpleapp-75c686cbb8   0         0         0       2m11s
replicaset.apps/simpleapp-fb5554fd9    1         1         1       89s
NAME                                         REVISION   DESIRED   CURRENT   TRIGGERED BY
deploymentconfig.apps.openshift.io/mariadb   1          1         1         config,image(mariadb:10.3-el8)
NAME                                       TYPE     FROM   LATEST
buildconfig.build.openshift.io/simpleapp   Source   Git    1
NAME                                   TYPE     FROM          STATUS     STARTED         DURATION
build.build.openshift.io/simpleapp-1   Source   Git@26e2f16   Complete   2 minutes ago   41s
NAME                                       IMAGE REPOSITORY                                                           TAGS     UPDATED
imagestream.image.openshift.io/simpleapp   default-route-openshift-image-registry.apps-crc.testing/nginx2/simpleapp   latest   About a minute ago
Using oc to manage OpenShift
The Basics
Examples of the basic need to know oc commands to deploy and manage containers on OpenShift. Set a few variables to prevent sensitive information in the terminal history.
export REGISTRY_USERNAME=YourUsername
export REGISTRY_PASSWORD=SomePassword
export REGISTRY_HOST=quay.io
export REGISTRY_EMAIL=mail@example.com
export OSU=developer
export OSP=SuperAw3SomePassrd
Pods
Using oc explain it is simple to get the ducumentation for the running version of OpenShift. Here are a few basics.
Get built-in documentation for Pods
oc explain pod
Get the pod spec
oc explain pod.spec
Details on the pod's containers
oc explain pod.spec.containers
Details about the pod's containers images
oc explain pod.spec.containers.image
Example of a pod file
apiVersion: v1
kind: Pod
metadata:
  name: hello-world-pod
  labels:
    app: hello-world-pod
spec:
  containers:
  - env:
    - name: MESSAGE
      value: Hi there! You've run a pod.
    image: docker.io/mcleary/helloworld-go
    imagePullPolicy: Always
    name: hello-world-override
    resources: {}
Create a Pod on OpenShift based on a file
oc create -f pod.yaml
Use oc get to information from OpenShift
Get pods
oc get pods
Watch pods deploy
oc get pods --watch
Get all resources
oc get all
Access the shell of a running container. Use oc get pods to get the pod name.
oc rsh <pod-name>
Use port forwards to interact with the pod on the local machine. Get the pod name from the oc get pods.
oc port-forward <pod-name> <local_port>:pod_port>
Delete OpenShift resources use the following syntax
oc delete <resource type> <resource name>
Delete a pod
oc delete pod <pod-name>
Deployments
Deploy an existing image based on its tag
oc new-app mcleary/helloworld-go:latest --as-deployment-config
Deploy an application from Git
oc new-app https://github.com/clusterapps/helloworld-go.git --as-deployment-config
Follow build progress when using
oc logs -f bc/helloworld-go
Set the name for the DeploymentConfig
oc new-app mcleary/helloworld-go --name hello-app --as-deployment-config
DeploymentConfig with a parameter
oc new-app MESSAGE="This is a parameter" mcleary/helloworld-go --name hello-app --as-deployment-config
DeploymentConfig with many patameters
oc new-app mysql MYSQL_USER=user MYSQL_PASSWORD=pass MYSQL_DATABASE=testdb -l db=mysql
Get information about a DeploymentConfig
Describe the DC to get its labels
oc describe dc/hello-app
Get the full YAML definition
oc get -o yaml dc/hello-app
Roll out the latest version of the application
oc rollout latest dc/hello-app
Roll back to the previous version of the application
oc rollback dc/hello-app
Scaling
General Syntax
oc scale dc/<dc name> --replicas=<desired replicas>
Manual scale to 3 pods
oc scale dc/helloworld-go --replicas=3
Scale down to one
oc scale dc/helloworld-go --replicas=1
General Syntax to create a HorizontalPodAutoscaler
oc autoscale dc/<dc name> \
  --min <desired minimum pods> \
  --max <desired maximum pods> \
  --cpu-percent=<desiredTargetCPU>
Auto scaling between 1 and 10 pods with an 80% CPU target
oc autoscale dc/helloworld-go \
  --min 1 \
  --max 10 \
  --cpu-percent=80
Show the HPA
oc get hpa
Information on the HPA
oc describe hpa/helloworld-go
YAML for the HPA
oc get -o yaml hpa/helloworld-go
Deleting resources
Delete a single resource
oc delete <resource> <name>
oc delete dc hello-app # Delete deployment config
oc delete svc hello-app # Delete a service
Delete all application resources using labels (get labels from oc describe)
oc delete all -l app=app=hello-app
Delete everything in a project
oc delete all --all
Templates
Get a list of templates
Templates in the working namespace
oc get template
Get built-in templates
oc get templates -n openshift
Get template details
Full details of the template.
oc describe template -n openshift mariadb-persistent
Get just the parameters for a template.
oc process --parameters mysql-persistent -n openshift
Create a new application from a template
oc new-app --template=mariadb-persistent \
 -p MYSQL_USER=jack -p MYSQL_PASSWORD=password \
 -p MYSQL_DATABASE=jack
Check the status of the deployment and get the pod name
oc get all
Full details of a pod from a template.
oc describe pod/mariadb-1-qlvrj
Networking
Access oc explain documentation
oc explain service
Get information about Service spec
oc explain service.spec
Get YAML definition for a service
oc get -o yaml service/hello-world
Get YAML definition for a route
oc get -o yaml route/hello-world
Creating services
Create a service for a single pod
oc expose --port 8080 pod/hello-world-pod
Create a service for a DeploymentConfig
oc expose --port 8080 dc/hello-world
Check that the service and pod are connected properly
oc status
Using Pod environment variables to find service Virtual IPs
Log into a pod. Get pod name from oc get pods
oc rsh pod/helloworld-2
Inside the pod, get all environment variables
env
Testing connectivity using environment variables with wget
wget -qO- $HELLOWORLD_GO_PORT_8080_TCP_ADDR:$HELLOWORLD_GO_PORT_8080_TCP_PORT
Creating Routes
Create a Route based on a Service. Get the service name from oc get svc
oc expose svc/helloworld-go
Get the Route URL
oc status
Check the route
curl helloworld-go-lab1.apps.okd4.example.com
ConfigMaps
Create a ConfigMap using literal command line arguments
oc create configmap helloconfig --from-literal KEY="VALUE"
Create from a file
oc create configmap helloconfig --from-file=MESSAGE.txt
Create from a file with a key override
oc create configmap helloconfig --from-file=MESSAGE=MESSAGE.txt
Create using --from-file with a directory
oc create configmap helloconfig --from-file pods
Verify
oc get -o yaml configmap/helloconfig
Consuming ConfigMaps as Environment Variables
Set environment variables
oc set env dc/hello-app --from cm/helloconfig
Secrets
Secrets use simalar syntax as ConfigMaps. Secrets are base64 encoded ConfigMaps
There are a few main types.
- Opaque
- Service Account Tokens
- Registry Authentication
- Simple Auth Types
A simple generic (Opaque) Secret. Key-Value pairs
oc create secret generic <secret-name> --from-literal KEY="VALUE"
Check the Secret
oc get -o yaml secret/<secret-name>
Consume the Secret as Environment Variables the same as ConfigMaps
oc set env dc/<dc-name> --from secret/<secret-name>
Create a default registry secret
oc create secret docker-registry secret_name
  --docker-server=$REGISTRY_HOST \
  --docker-username=$REGISTRY_USERNAME \
  --docker-password=$REGISTRY_PASSWORD \
  --docker-email=$REGISTRY_EMAIL
Link the secret to the service account named "default"
oc secrets link default secret_name --for=pull
Check that the service account has the secret associated
oc describe serviceaccount/default
Decoding secrets. First get the hash.
- mysecret = name of secret
- password = is the entry to decode
oc get secret mysecret -o yaml |grep password
Result simalar to password: cGFzc3dvcmQ=
Decode as base64
echo "cGFzc3dvcmQ=" |base64 -d
Images
ImageStreams
List ImageStreams
oc get is
oc get istag
Create the ImageStream but don't deploy
oc import-image --confirm quay.io/clearyme/helloworld-go
Importing any new images from the repository using the same command as importing a new.
oc import-image --confirm quay.io/clearyme/helloworld-go
Creating a new local tag : oc tag <original> <destination>
oc tag $REGISTRY_HOST/$REGISTRY_USERNAME/helloworld-go:latest helloworld-go:local-1
Deploy an application based on your new ImageStream (lab1 is the name of the oc project with the newly tagged image)
oc new-app lab1/helloworld-go:local-1
Build a custom image
From within the directory where the Dockerfile is, build the image and tag it for the registry.
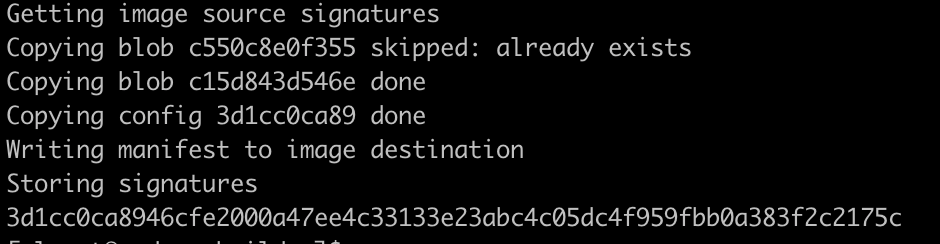
podman build -t $REGISTRY_HOST/$REGISTRY_USERNAME/helloworld-go:latest .
Log into a registry
podman login $REGISTRY_HOST
Push the image ti the registery
podman push $REGISTRY_HOST/$REGISTRY_USERNAME/helloworld-go
Builds and BuildConfigs
Create a new BuildConfig from a Git repository URL
oc new-build <git URL>
Example
oc new-build https://github.com/clusterapps/helloworld-go.git
Example new build from s branch
oc new-build https://github.com/clusterapps/helloworld-go.git#update
Example using --context-dir to build from a subdirectory
oc new-build https://github.com/clusterapps/openshift-playing.git --context-dir hello-world-go
Working with existing BuildConfigs
Get a list of BuildConfigs
oc get bc
Start a build
oc start-build bc/helloworld
Get the list of builds
oc get build
Get logs for a single build
oc logs -f build/helloworld-go-1
Get logs for the latest build for a BuildConfig
oc logs -f bc/helloworld-go
Use oc cancel-build to stop a build
``
oc cancel-build build/helloworld-go-1
Working with WebHooks
Get the secret token
oc get -o yaml buildconfig/helloworld-go
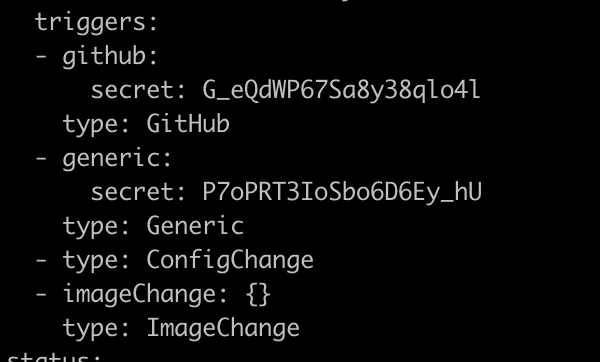
Export the secret as a variable
export GENERIC_SECRET=G_eQdWP67Sa8y38qlo4l
Get the webhook URL
oc describe buildconfig/helloworld-go
 Copy the webhook URL and replace
 <secret> with $GENERIC_SECRET
curl -X POST -k <webhook URL with secret replaced with $GENERIC_SECRET>
Set build hooks
Set a post-commit hook
oc set build-hook bc/helloworld-go \
  --post-commit \
  --script="echo Hello from build hook"
Check the logs output for "Hello from a build hook"
oc logs -f bc/helloworld-go
Check the events to see if it ran
oc get events
Remove a build hook
oc set build-hook bc/helloworld-go \
  --post-commit \
  --remove
Source to Image
The syntax is the same as normal builds. OpenShift uses S2I to guess the language when there is no Dockerfile. A language can also be specified at build time durring the oc new-app.
Works with Java, Ruby, Node, PHP, Python and PERL,
Overriding S2I Scripts
Assemble and Run are the two main scripts
Overrides go in your source at .s2i/bin/assemble or .s2i/bin/run
They need to call the original scripts, which are at /usr/libexec/s2i/assemble or /usr/libexec/s2i/run
New app without a Dockerfile.
oc new-app https://github.com/clusterapps/openshift-playing.git --context-dir s2i/ruby
New app specifying the language by adding language tilda to the new-app command.
oc new-app ruby~https://github.com/clusterapps/openshift-playing.git --context-dir s2i/ruby
New app from a git branch
oc new-app https://github.com/clusterapps/helloworld-go.git#updates
Volumes
Check out the built-in documentation
oc explain persistentvolume.spec or the The official Kubernetes Documentation for Volumes
Most deployent of k8s and OpenShift may have a dynamic storageclass. You can just the dynamic storage by specifying the mountpoint and size. For manual storage, here are some examples.
Storage basics for containers.
Mount Volumes
emptyDir
oc set volume dc/<dc name> --add --type emptyDir --mount-path <path inside container>
Example: Add an emptyDir volume. An emptyDir is ephemeral. It will survive a pod reboot, but will be deleted when the pod is deleted. Only good for testing.
oc set volume dc/helloworld-go --add \
  --type emptyDir \
  --mount-path /emptydir
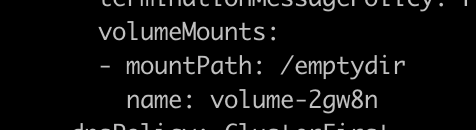
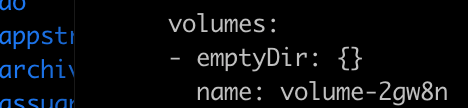
View the DeploymentConfig to view the volume information. Look for container.volumeMounts and volumes.
oc get -o yaml dc/helloworld-go
ConfigMaps
Basic example
oc set volume <DC name> --add --configmap-name <configmap name> -mount-path <path inside container>
Create the configmap to use as a Volume
oc create configmap volume-file --from-literal file.txt="Contents"
Mount the ConfigMap
oc set volume dc/helloworld-go --add --configmap-name volume-file --mount-path /configs/
NFS
NFS is a very common storage method. It's cheap and easy to manage, but does have its own pitfalls.
Create an NFS persistent volume(PV) defination. A regular user cannot create PV.
cat > nfs.yml <<EOF
apiVersion: v1
kind: PersistentVolume
metadata:
  name: nfspv
spec:
  capacity:
    storage: 5Gi
  accessModes:
    - ReadWriteMany
  nfs:
    path: /nfsshare
    server: 172.20.255.2
  persistentVolumeReclaimPolicy: Retain
EOF
Map a PVC to a PV
Create the PVC YAML
cat > nfspvc.yml <<EOF
kind: PersistentVolumeClaim
apiVersion: v1
metadata:
  name: nfs001
spec:
  accessModes:
    - ReadWriteOnce
  resources:
    requests:
      storage: 1Gi
  volumeName: nfspv
  storageClassName: ''
  volumeMode: Filesystem
EOF
Mount the pvc to a directory
oc set volume dc/helloworld-go --add --name=nfs001 -t pvc --claim-name=nfs001 -m /data
Basic troubleshooting
Retrieve the logs from a build configuration
oc logs bc/<application-name>
If a build fails, after finding and fixing the issues, run the following command to request a new build:
oc start-build <application-name>
Deployment logs
oc logs dc/<application-name>
Temporarily access some of these missing commands is mounting the host binaries folders, such as /bin, /sbin, and /lib, as volumes inside the container
sudo podman run -it -v /bin:/bin image /bin/bash