Deploy and Configure
Installation guides for popular and unknown software packages.
- Automation
- Ansible inventory from a csv file.
- AWX on CentOS 8
- Control Node Setup
- Inventory from gathered facts.
- oVirt - Windows Template
- vCenter - Linux Templates
- Windows Build Server
- Windows Managed Node Setup
- Citrix Virtual Apps and Desktops
- Export and Import Policies
- Intro to Citrix
- Upgrading Client VDA
- Upgrading Components
- Upgrading the Site and Database
- Identity and Access Management
- Oracle Things
- APEX on Docker
- OCI CLI setup
- Oracle Database 19c EE
- Oracle Database 21c
- Oracle Enterprise Manager 13.5 on OL8
- Oracle Enterprise Manager Cloud Control 13c
- Oracle ORDS and Apache
- Oracle Response Files
- Oracle XE and APEX on CentOS 7
- Web Applications
- XCP-ng / Citrix Hypervisor
Automation
or the lie that is DevOps
Ansible inventory from a csv file.
General
Create an Ansible inventory in YAML format using the following steps.
Assuming that the CSV file has the following structure:
Hostname,IP Address,Variable1,Variable2,Variable3
host1,192.168.1.1,value1,value2,value3
host2,192.168.1.2,value4,value5,value6
Local Use
-
Convert the CSV file to a YAML file format
-
Use Ansible's
yaml_inventory_pluginto parse the YAML file and create the inventory
Sample playbook
---
- hosts: localhost
  gather_facts: no

  vars:
    csv_file: /path/to/csv/file.csv
    yaml_file: /path/to/yaml/file.yaml

  tasks:
    - name: Convert CSV to YAML
      community.general.csv_to_yaml:
        path: "{{ csv_file }}"
        output_file: "{{ yaml_file }}"

    - name: Create inventory from YAML
      ansible.builtin.add_host:
        name: "{{ item.Hostname }}"
        ansible_host: "{{ item['IP Address'] }}"
        variable1: "{{ item.Variable1 }}"
        variable2: "{{ item.Variable2 }}"
        variable3: "{{ item.Variable3 }}"
      loop: "{{ lookup('yaml', yaml_file) }}"
In this example, the csv_to_yaml Ansible Galaxy module is used to convert the CSV file to YAML format. The add_host module is then used to create the inventory based on the YAML file contents.
You can run this playbook with the following command:
ansible-playbook -i localhost, inventory.yml
AWX/AAP/Tower
Assuming that the CSV file has the following structure:
group,host,IP Address,Variable1,Variable2,Variable3
group1,host1,192.168.1.1,value1,value2,value3
group2,host2,192.168.1.2,value4,value5,value6
group2,host3,192.168.1.3,value4,value5,value6
Here's an example Ansible playbook that reads a CSV file and creates an inventory in Ansible AWX, or Ansible Automation Platform.
You'll need to fill in the values for tower_host, tower_username, tower_password, tower_org, tower_inventory_name, and csv_file.
The playbook has four tasks:
- Load CSV file: This task loads the CSV file and stores the content in the csv_content variable.
- Create groups in Ansible Tower: This task creates groups in Ansible Tower based on the values in the group column of the CSV file. The loop parameter iterates over the unique values of the group column.
- Create hosts in Ansible Tower: This task creates hosts in Ansible Tower based on the values in the host column of the CSV file. The loop parameter iterates over the unique values of the host column.
- Add host variables to Ansible Tower hosts: This task adds variables to the hosts in Ansible Tower based on the values in the CSV file. The loop parameter iterates over each row in the CSV file.
---
- name: Create Ansible Tower Inventory from CSV
  hosts: localhost
  gather_facts: no

  vars:
    csv_file: /path/to/csv/file.csv
    tower_host: <Ansible Tower Host>
    tower_username: <Ansible Tower Username>
    tower_password: <Ansible Tower Password>
    tower_org: <Ansible Tower Organization>
    tower_inventory_name: <Ansible Tower Inventory Name>

  tasks:
    - name: Load CSV file
      read_csv:
        path: "{{ csv_file }}"
        delimiter: ","
      register: csv_content

    - name: Create groups in Ansible Tower
      tower_group:
        tower_host: "{{ tower_host }}"
        tower_username: "{{ tower_username }}"
        tower_password: "{{ tower_password }}"
        tower_organization: "{{ tower_org }}"
        name: "{{ item.group }}"
        state: present
      loop: "{{ csv_content.list | unique('group') }}"

    - name: Create hosts in Ansible Tower
      tower_host:
        tower_host: "{{ tower_host }}"
        tower_username: "{{ tower_username }}"
        tower_password: "{{ tower_password }}"
        tower_organization: "{{ tower_org }}"
        inventory_name: "{{ tower_inventory_name }}"
        name: "{{ item.host }}"
        state: present
      loop: "{{ csv_content.list | unique('host') }}"

    - name: Add host variables to Ansible Tower hosts
      tower_host:
        tower_host: "{{ tower_host }}"
        tower_username: "{{ tower_username }}"
        tower_password: "{{ tower_password }}"
        tower_organization: "{{ tower_org }}"
        inventory_name: "{{ tower_inventory_name }}"
        name: "{{ item.host }}"
        variables: "{{ item.vars }}"
        state: present
      loop: "{{ csv_content.list }}"
A config file can be used in place of credentials being located in the playbook.
The ~/.tower_cli.cfg file is a configuration file used by the Ansible Tower CLI tool, tower-cli. It is located in the home directory of the user running tower-cli.
This file stores configuration settings for tower-cli such as the URL of the Ansible Tower server, the username and password used to authenticate to the server, and other options related to the tool's behavior.
[tower]
host = https://my-ansible-tower-server.com
username = my-username
password = my-password
verify_ssl = false
In this example, the [tower] section specifies the configuration settings for the Ansible Tower server. The host parameter specifies the URL of the server, while the username and password parameters specify the credentials used to authenticate to the server. The verify_ssl parameter can be set to true or false to indicate whether SSL certificates should be verified when making requests to the server.
By default, tower-cli looks for the ~/.tower_cli.cfg file in the user's home directory. However, you can specify a different location for the configuration file by setting the TOWERCLI_CONFIG environment variable to the path of the file.
AWX on CentOS 8
Log in to your CentOS 8 server, open a terminal window, and issue the following commands:
sudo dnf install epel-release -y
sudo dnf install git gcc gcc-c++ ansible nodejs gettext device-mapper-persistent-data lvm2 bzip2 python3-pip -y
How to install Docker and Docker Compose
(Podman coming soon.)
We now need to install both Docker and Docker Compose. The first thing to do is add the necessary repository with the command:
sudo dnf config-manager --add-repo=https://download.docker.com/linux/centos/docker-ce.repoOnce the repository is added, install the latest version of Docker with the command:
sudo dnf install docker-ce-3:18.09.1-3.el7 -yStart and enable the Docker engine with the commands:
sudo systemctl start docker
sudo systemctl enable docker
Add your user to the docker group with the command:
sudo usermod -aG docker $USERLog out and log back in.
Install docker-compose via pip3 with the command:
sudo pip3 install docker-composeFinally, set python to use Python 3 with the command:
alternatives --set python /usr/bin/python3How to install AWX
Now we can finally install AWX. Clone the latest release with the command:
git clone https://github.com/ansible/awx.gitNext, generate a secret encryption key with the command:
openssl rand -base64 30Copy the key that is generated to your clipboard.
Change into the newly downloaded AWX directory with the command:
cd awx/installerOpen the AWX inventory file with the command:
nano inventoryIn that file, you'll need to (at a minimum), edit the following configuration options. First, locate the line:
secret_key=In that line, paste the secret key you generated earlier.
Next, look for the line:
admin_password=passwordChange the password to a strong, unique password.
Finally, look for the line that starts with:
#awx_alternate_dns_servers=Change that line to:
awx_alternate_dns_servers="8.8.8.8,8.8.4.4"You can then go through the rest of the inventory file and edit as needed. But, the above changes should result in a successful installation.
Create a directory for Postgres with the command:
sudo mkdir /var/lib/pgdockerInstall AWX with the command:
sudo ansible-playbook -i inventory install.ymlThis should take about five to10 minutes to complete.
SELinux and firewall
Before we can access the AWX site, we need to disable SELinux. Issue the command:
sudo nano /etc/sysconfig/selinuxChange the line:
SELINUX=enforcingTo:
SELINUX=disabledSave and close the file. Restart your system so the changes will take effect.
The last step is to modify the firewall. This is done with the following commands:
sudo firewall-cmd --zone=public --add-masquerade --permanent
sudo firewall-cmd --permanent --add-service=http
sudo firewall-cmd --permanent --add-service=https
sudo firewall-cmd --reloadControl Node Setup
A deployment controller could be a dedicated server or a workstation.
From command line
Clone the Private Data System repository
git clone https://github.com/clusterapps/PrivateSystem.gitReview required settings.
From Tower or AWX
A:) Clone and modify for your own environment
git clone https://git.clusterapps.com/ansible/tower-pds-base.gitB:) Create a new Project and assign to specific groups.
step-by-step coming soon
Additional Settings
Additional items for a Windows environment.
Download the Windows virtio drivers. These drivers are needed to Windows guests running on KVM.
On a web server or software distribution server:
wget https://fedorapeople.org/groups/virt/virtio-win/virtio-win.repo -O /etc/yum.repos.d/virtio-win.repo
yum install -y virtio-win
cp /usr/share/virtio-win/virtio-win.iso /var/www/html/iso/
Inventory from gathered facts.
Playbook example
---
- name: Generate YAML Inventory File from Gathered Facts
  hosts: all
  gather_facts: true
  tasks:
    - name: Gather facts from hosts
      setup:

    - name: Create YAML inventory file
      copy:
        content: |
          all:
            children:
              hosts:
                hosts:
          {{ hostvars[item].inventory_hostname }}:
            ansible_host: {{ hostvars[item].ansible_host }}
            ansible_user: {{ hostvars[item].ansible_user }}
            ansible_port: {{ hostvars[item].ansible_port }}
            ansible_ssh_pass: {{ hostvars[item].ansible_ssh_pass | default('') }}
            ansible_ssh_private_key_file: {{ hostvars[item].ansible_ssh_private_key_file | default('') }}
          inventory_hostname: {{ hostvars[item].inventory_hostname }}
        dest: /path/to/your/output/inventory.yaml
        mode: 0644
      loop: "{{ ansible_play_batch }}"
      run_once: yes
We define a play named "Generate YAML Inventory File from Gathered Facts" that runs on all hosts (hosts: all) and enables fact gathering with gather_facts: true.

In the first task, we use the setup module to gather facts from the hosts.

In the second task, we use the copy module to create the YAML inventory file. We loop through each host in ansible_play_batch (which contains all the hosts that ran this play) and format the gathered facts into the inventory file.

    ansible_host, ansible_user, ansible_port, ansible_ssh_pass, ansible_ssh_private_key_file, and inventory_hostname are some of the facts we include in the inventory file.

    The inventory file is saved at the specified destination path (/path/to/your/output/inventory.yaml) with appropriate file permissions (mode 0644).
Make sure to replace /path/to/your/output/inventory.yaml with the actual path where you want to save the generated YAML inventory file.
You can run this playbook with the ansible-playbook command:
oVirt - Windows Template
To create an Ansible playbook that deploys a Windows VM from a template on oVirt, customizes the OS with sysprep, sets unique hostname and static IP, and performs other specified configurations, follow the structure below. This example assumes you have a sysprep file ready for Windows customization and your oVirt environment is properly set up for Ansible integration.
First, ensure you have the ovirt.ovirt collection installed, which includes modules for interacting with oVirt. If not, you can install it using Ansible Galaxy:
ansible-galaxy collection install ovirt.ovirt
Here's an example playbook that meets your requirements. You'll need to adjust variables and possibly the paths to files (like the sysprep file) to match your environment.
---
- name: Deploy and customize a Windows VM on oVirt
  hosts: localhost
  gather_facts: no
  collections:
    - ovirt.ovirt

  vars:
    ovirt_engine_url: https://ovirt-engine.example.com/ovirt-engine/api
    ovirt_engine_username: admin@internal
    ovirt_engine_password: your_password
    ovirt_engine_cafile: /path/to/your/ovirt-engine.ca
    vm_domain: "example.com"
    vm_subnet: "255.255.255.0"
    vm_gateway: "10.10.10.1"
    vm_dns: "10.1.10.10"
    additional_disk_size: 20GB
    machines:
      - { name: dc01, memory: 4GiB, cluster: kvm_worker, template: Windows2022Core, datasize: 90, storage: data-kvm2, tag: lab, ip: 10.10.10.12}
      - { name: dc02, memory: 4GiB, cluster: kvm_worker, template: Windows2022Core, datasize: 90, storage: data-kvm2, tag: lab, ip: 10.10.10.11}
      - { name: wadm01, memory: 8GiB, cluster: kvm_worker,  template: Windows2022, datasize: 90, storage: data-kvm2, tag: lab, ip: 10.10.10.10}

  tasks:
    - name: Log into oVirt
      ovirt.ovirt.ovirt_auth:
        url: "{{ ovirt_engine_url }}"
        username: "{{ ovirt_engine_username }}"
        password: "{{ ovirt_engine_password }}"
        ca_file: "{{ ovirt_engine_cafile }}"
        state: present

    - name: Deploy VMs
      ovirt.ovirt.ovirt_vm:
        auth: "{{ ovirt_auth }}"
        name: "{{ item.name }}.{{ vm_domain }}"
        template: "{{ item.template }}"
        cluster: "{{ item.cluster }}"
        cpu_cores: 2
        cpu_sockets: 1
        memory: "{{ item.memory }}"
        sysprep:
          hostname: "{{ item.name | upper}}"
          ip: "{{ item.ip }}"
          netmask: "{{ vm_subnet }}"
          gateway: "{{ vm_gateway }}"
          dns_servers: "{{ vm_dns }}"
          domain: "{{ vm_domain }}"
          root_password: "{{ vm_admin }}"
        state: present
      with_items:
        - "{{ machines }}"

    - name: Add Software Storage
      ovirt.ovirt.ovirt_disk:
        auth: "{{ ovirt_auth }}"
        name: "{{ item.name }}-Disk2"
        vm_name: "{{ item.name }}.{{ vm_domain }}"
        size: "{{ item.datasize }}GiB"
        format: cow
        interface: virtio_scsi
        storage_domain: "{{ item.storage }}"
      with_items:
        - "{{ machines }}"

    - name: Start VMs
      ovirt.ovirt.ovirt_vm:
        auth: "{{ ovirt_auth }}"
        name: "{{ item.name }}.{{ vm_domain }}"
        state: running
      with_items:
        - "{{ machines }}"

    - name: Tag machines
      ovirt.ovirt.ovirt_tag:
        auth: "{{ ovirt_auth }}"
        name: "{{ item.tag }}"
        state: attached
        vms:
          - "{{ item.name }}.{{ vm_domain }}"
      with_items:
        - "{{ machines }}"


    # Assuming the VM is to be powered on after setup
    - name: VMs should be running
      ovirt.ovirt.ovirt_vm:
        auth: "{{ ovirt_auth }}"
        name: "{{ vm_hostname }}"
        state: running

    - name: Logout from oVirt
      ovirt.ovirt.ovirt_auth:
        state: absent
        auth: "{{ ovirt_auth }}"
Remember to replace placeholders (like URLs, credentials, paths, domain names, and the storage domain) with your actual data. Also, ensure your sysprep file is correctly set up in your template or specified directly in the playbook if needed.
This playbook performs the following actions:
- Logs into the oVirt engine.
- Creates a VM from a specified template with a unique hostname and configures it with sysprep.
- Adds an additional 100GB disk to the VM.
- Configures the VM's network interface.
- Powers on the VM after setup.
- Logs out from the oVirt engine.
Test this playbook in a development environment before using it in production. Adjustments may be necessary based on your specific oVirt setup, Windows template, and network configuration.
vCenter - Linux Templates
To deploy multiple VMs with different hostnames and IP addresses while utilizing the customization capabilities provided by the vmware_guest module in Ansible, you can use VMware's customization specifications. This approach allows for more advanced customization options, such as setting the domain, hostname, and network settings directly within the playbook. Below is an example of how to modify the playbook to use VMware's customization feature for deploying 3 VMs with distinct configurations:
Inventory
To create a separate inventory file with all the variables used in the provided playbook, you'll need to organize these variables in a structured way. Ansible inventory files can be in INI or YAML format, but for complex configurations like this, YAML is more suitable due to its support for hierarchical data.
Below is an example of how to create an Ansible inventory file in YAML format (inventory.yml) that defines all the variables required by your playbook. This example demonstrates setting up variables for deploying three VMs, but you can adjust the quantities and details as needed:
all:
  vars:
    vcenter_hostname: vcenter.example.com
    vcenter_username: admin@vsphere.local
    vcenter_password: securepassword
    vcenter_datacenter: DC1
    vcenter_folder: /DC1/vm/ansible_managed_vms
    vcenter_cluster: Cluster1
    vm_template: CentOS_Template
    vm_network: VM_Network
    vm_netmask: 255.255.255.0
    vm_gateway: 192.168.1.1
    dns01: 8.8.8.8
    dns02: 8.8.4.4
    hosts:
      vm01:
        vm_name: vm01
        vm_ip: 192.168.1.101
        vm_ram: 2048
        vm_cores: 2
        vm_sockets: 1
        vm_notes: "VM01 Notes"
        vm_department: "department1"
        vm_application: "Application1"
        vm_role: "Role1"
        vm_env: "Development"
        vm_buildcode: "Build01"
        vm_lifecycle: "Lifecycle1"
        vm_contact: "Contact1"

      vm02:
        vm_name: vm02
        vm_ip: 192.168.1.102
        vm_ram: 4096
        vm_cores: 4
        vm_sockets: 2
        vm_notes: "VM02 Notes"
        vm_department: "department2"
        vm_application: "Application2"
        vm_role: "Role2"
        vm_env: "Testing"
        vm_buildcode: "Build02"
        vm_lifecycle: "Lifecycle2"
        vm_contact: "Contact2"

      vm03:
        vm_name: vm03
        vm_ip: 192.168.1.103
        vm_ram: 8192
        vm_cores: 4
        vm_sockets: 2
        vm_notes: "VM03 Notes"
        vm_department: "department3"
        vm_application: "Application3"
        vm_role: "Role3"
        vm_env: "Production"
        vm_buildcode: "Build03"
        vm_lifecycle: "Lifecycle3"
        vm_contact: "Contact3"
Adjusting the Inventory
-
Hosts and Variables: The example above assumes you are deploying three VMs (
vm01,vm02, andvm03). Each VM has its set of variables defined underhosts. You can add more VMs or adjust the existing definitions as needed. -
Global Variables: Variables that are common across all VMs are defined under
all: vars. This includes vCenter connection details, network configuration, and Infoblox provider details. These can be overridden at the host level if necessary. -
Customization: Tailor the inventory to match your environment's specifics, including vCenter details, template names, network settings, and VM specifications.
This approach allows you to manage your infrastructure as code, making deployments repeatable and reducing the likelihood of human error.
Playbook: deploy_vms.yml
---
- name: Deploy Multiple VMs on vCenter
  hosts: all
  gather_facts: false

  tasks:
    - name: Setting Facts
      set_fact:
        vm_guest_name: "{{ vm_name | upper }}"
        vm_hostname: "{{ vm_name | lower }}"

    - name: Deploy or Clone Linux VM
      vmware_guest:
        hostname: "{{ vcenter_hostname }}"
        username: "{{ vcenter_username }}"
        password: "{{ vcenter_password }}"
        validate_certs: no
        datacenter: "{{ vcenter_datacenter }}"
        folder: "{{ vcenter_folder }}"
        name: "{{ vm_guest_name }}"
        cluster: "{{ vcenter_cluster }}"
        state: poweredon
        template: "{{ vm_template }}"
        annotation: "{{ vm_notes }}"
        hardware:
          memory_mb: "{{ vm_ram }}"
          num_cpus: "{{ vm_cores }}"
          num_cpu_cores_per_socket: "{{ vm_sockets }}"
        networks:
          - name: "{{ vm_network }}"
            ip: "{{ vm_ip }}"
            netmask: "{{ vm_netmask }}"
            gateway: "{{ vm_gateway }}"
        wait_for_ip_address: yes
        wait_for_customization: yes
        cdrom:
          type: none
        customization:
          hostname: "{{ vm_hostname }}"
          domain: "example.com"
          timezone: "America/New_York"
          dns_servers:
            - "{{ dns01 }}"
            - "{{ dns02 }}"
      delegate_to: localhost
      register: vmcreate


    - name: Add Custom Attributes to the VM
      vmware_guest_custom_attributes:
        hostname: "{{ vcenter_hostname }}"
        username: "{{ vcenter_username }}"
        password: "{{ vcenter_password }}"
        validate_certs: no
        name: "{{ vm_guest_name }}"
        attributes:
          - name: Department
            value: "{{ vm_department | default('') }}"
          - name: Application
            value: "{{ vm_application | default('') }}"
          - name: Role
            value: "{{ vm_role | default('') }}"
          - name: Environment
            value: "{{ vm_env | default('') }}"
          - name: Automation
            value: "Baseline"
          - name: buildcode
            value: "{{ vm_buildcode | default('') }}"
          - name: lifecycle
            value: "{{ vm_lifecycle | default('') }}"
          - name: Contact
            value: "{{ vm_contact | default('') }}"
Explanation of Each Task
-
Setting Facts: Converts the VM name to uppercase and lowercase versions for different uses, such as the display name in vCenter (
vm_guest_name) and the internal hostname of the VM (vm_hostname). -
Deploy or Clone Linux VM: Uses the
vmware_guestmodule to either deploy a new VM or clone an existing one from a template specified in the inventory. This task includes configuring the VM's hardware specifications, network settings, and customization specifications like the hostname and DNS settings. It waits for the IP address to be assigned and customization to complete before proceeding. -
Add Custom Attributes to the VM: Adds custom attributes to the newly created VM in vCenter. These attributes can include metadata such as the department, application, role, and environment the VM is associated with. This helps in organizing and managing VMs based on these metadata.
Running the Playbook
To run this playbook, use the following command, ensuring you specify the inventory file:
ansible-playbook -i inventory.yml deploy_vms.yml
This command tells Ansible to deploy VMs as configured in inventory.yml, applying the settings and customizations specified for each VM.
Notes:
- Template Requirements: The template you use must be prepared for customization. For Linux VMs, ensure VMware Tools is installed, and the Perl scripting language is available for the customization scripts to run.
- Customization Script: VMware's customization mechanism uses a script that runs on the first boot. If the customization does not apply, troubleshooting may involve checking that VMware Tools is correctly installed and that the template is properly prepared for cloning and customization.
- Ansible and VMware Versions: Ensure you are using recent versions of Ansible and the VMware modules, as improvements and bug fixes are regularly added.
This method leverages VMware's powerful customization engine, allowing for a wide range of customization options beyond what was demonstrated here.
Windows Build Server
A service for building custom WIM images for deployments.
The WIM images may contain additional drivers or post setup deployment scripts.
WIM images can be server or desktop OS and are useful in virtual and physical environment deployments.
Build
To build the server, start with a fresh install of Windows Server. This example will be based on Windows Server 2016. The example should work on Windows Server 2019 with little to no modification.
Only a few modifications were changed to the installation.
- Server name
- Network Settings
- Driver installation
- Disable IE lock down settings. (Needed to download drivers)
- Create new local user in the administrators group. (Security will be configured later)
- Remote Desktop enabled for easy of use.
- Ansible prep powershell script run. Download Here.
Download the Windows Builder role or Private Data System playbook to deploy the build server.
Update the inventory file.
Run the deploy-winbuild playbook.
Configure
Updates.
The Windows update portion of the build can be very time consuming. To speed up the build time and the WIM updating process, the updates will be downloaded ahead of time. This is not necessary to run manually since the buld scripts will run the updates tools too.
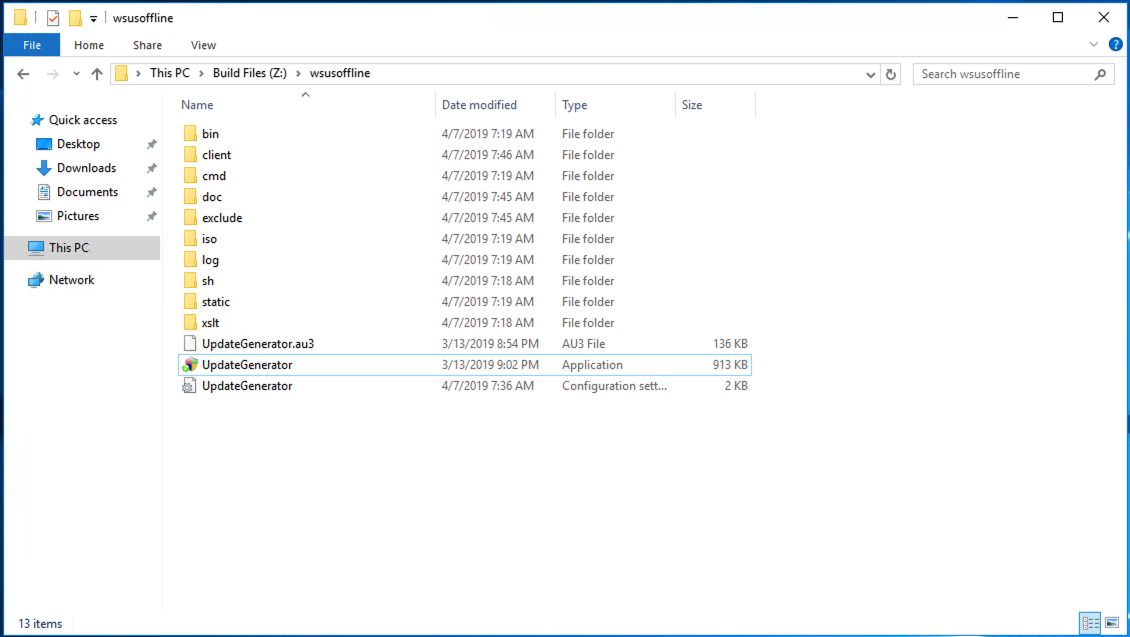
Sign in to the Windows Build Server and go to the <wsus-offline-updater> folder.
Run the UpdateGenerator.exe
Select the version(s) of Windows to download updates for.
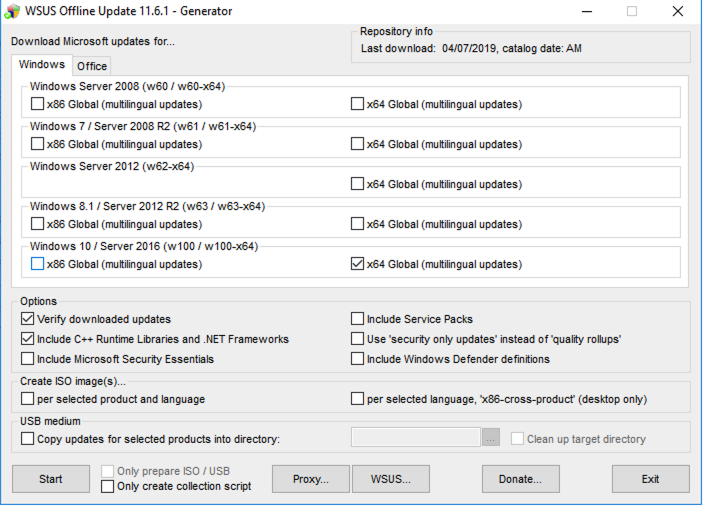
This example will only download updates for Windows 10 and Windows Server 2016.
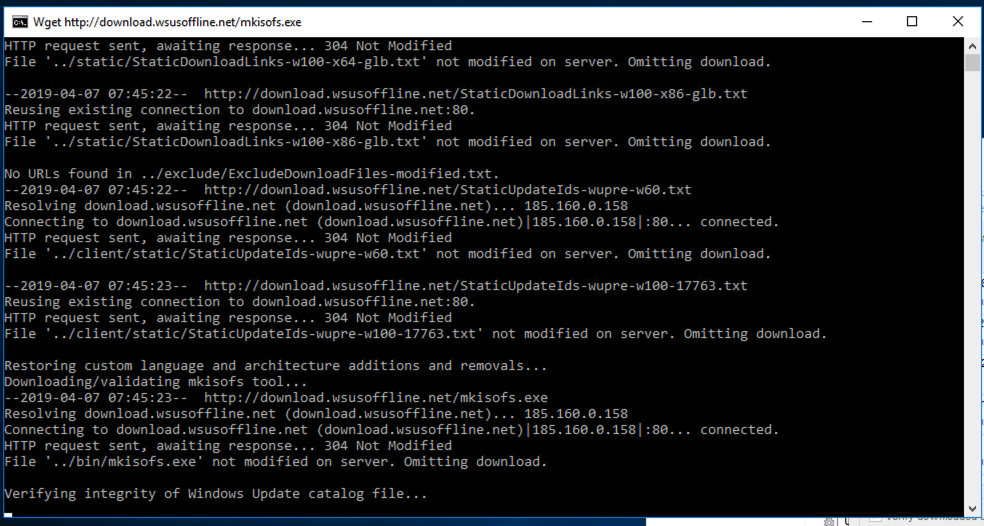
After a few moments the UpdateGenerator will begin to run.
This process may take a very long time depending on the number of versions selected and if Office was included.
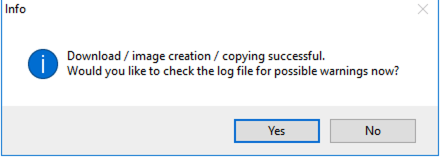
When the process is complete, a prompt will appear to review the logs.
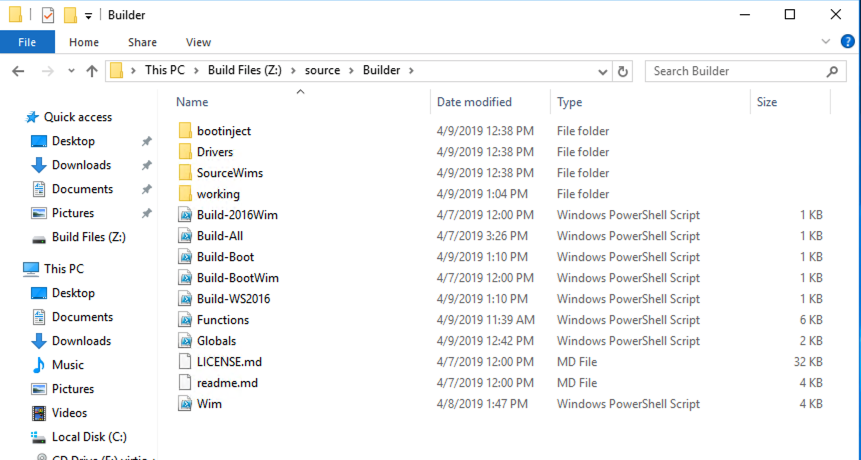
Drivers
Sign in to the Windows Build Server and go to the source\Builder\Drivers folder.
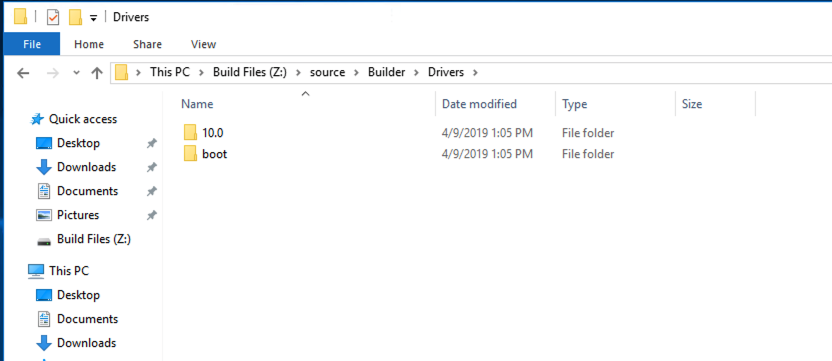
There are folders for each Windows version that can be deployed. The boot directory is for WinPE and 10.0 is for Windows Server 2016. Note that Windows Server 2019 will also build in the 10.0 folder. (For now)
Copy the drivers that are needed to the folders. The folders are recursively scanned, so add as many as you need. To keep the WinPE size to a minimum, only place drivers required for install in the boot folder. At a minimum, this would be the storage and networking drivers. For this example, the hypervisor is KVM. The virtstor and netkvm drivers were added to the folders. For the actual OS image place all of the needed inf in the folder. Multiple drivers for multiple hardware platforms can be copied to the folders to allow for a simple image to be used on many platforms.
If drivers require a setup file to be run, we'll add those to the post install playbooks. More on that later.
Images
There are two base WIM files that will be needed to build the custom ones. You will need a copy of the Windows Server ISO along with the Windows Assessment and Deployment Kit, and the Windows Assessment and Deployment Kit Windows Preinstallation Environment Add-on. Both Windows ADK components are installed when using the deploy-winbuild playbook.
boot.wim: Copy the winpe.wim file from C:\Program Files (x86)\Windows Kits\10\Assessment and Deployment Kit\Windows Preinstallation Environment\amd64\en-us to \source\Builder\SourceWims\boot and rename the files boot.wim.
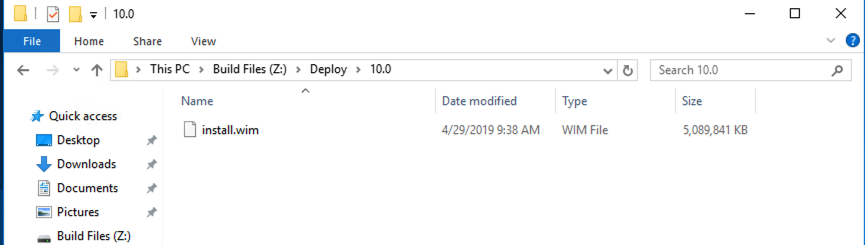
install.wim: You will need a licensed copy of the Windows Server installation media for this step. If you configured the playbook to download the ISO file it will be located in the \source\ISO directory on the build system. Copy the DVD:\sources\install.wim file to \source\Builder\SourceWims\boot. Do not change the file name.
Building Images
Once all of the base requirements are in place, it is time to run the build scripts. These script are modified versions of the Foreman build scripts. Open the \source\Builder folder and run the Build-All.ps1 in an elevated PowerShell console.

After the build scrips have created the new WIM files, they will be located in the \Deploy directory on the build server. Review the date modified and the file size to determine that the file has recently been updated. Unless the build scripts fail, most error messages can be ignored.
The deploy-winbuild playbook automatically shared this folder to the network. These files are now ready for deployment and can be used with your favorite deployment tools.
Windows Managed Node Setup
Setup a Windows host - local UI
Setting up a Windows Server to be managed by Ansible involves a few key steps. Ansible communicates with Windows servers over WinRM (Windows Remote Management), which is a Windows-native remote management protocol based on WS-Management (Web Services-Management). The setup process generally includes configuring WinRM on the Windows server and preparing the Ansible control machine to manage Windows hosts.
Here are the steps to prepare a Windows Server for management with Ansible:
1. Configure WinRM on the Windows Server
The easiest way to configure WinRM for Ansible is to use the ConfigureRemotingForAnsible.ps1 script, which is provided in the Ansible documentation. This script sets up WinRM to use basic authentication and configures it to allow connections from Ansible.
-
Download the Script: On the Windows Server, open PowerShell as an Administrator and run the following command to download the script:
Invoke-WebRequest -Uri "https://raw.githubusercontent.com/ansible/ansible-documentation/devel/examples/scripts/ConfigureRemotingForAnsible.ps1" -OutFile "ConfigureRemotingForAnsible.ps1" -
Run the Script: Execute the script you just downloaded:
.\ConfigureRemotingForAnsible.ps1This script will configure WinRM to use HTTP (port 5985), enable basic authentication, and create a firewall rule to allow WinRM traffic.
-
Note: For a production environment, it's recommended to use HTTPS (port 5986) with certificate-based authentication for increased security. This setup is more complex and requires installing a valid certificate on the Windows Server and additional WinRM configuration.
2. Prepare the Ansible Control Machine
On the Ansible control machine, which is typically a Linux system, you need to install pywinrm to enable WinRM support. This can be done using pip:
pip install pywinrm
3. Configure Ansible Inventory
Edit your Ansible inventory file to include your Windows hosts. You can define them under a specific group [windows] and specify the necessary variables:
[windows]
windows-server.example.com

[windows:vars]
ansible_user=Administrator
ansible_password=YourPassword
ansible_connection=winrm
ansible_winrm_server_cert_validation=ignore
Security Note: Storing passwords in plaintext in the inventory file is not secure. Consider using Ansible Vault to encrypt sensitive data.
4. Test the Configuration
Now, test your setup by running a simple Ansible command to ping the Windows server:
ansible windows -m win_ping
If everything is configured correctly, the win_ping module should return a success message.
Additional Notes
- Ensure network connectivity between the Ansible control machine and the Windows Server, specifically that the required WinRM port (5985 for HTTP, 5986 for HTTPS) is open.
- The setup process might vary slightly depending on the specific version of Windows Server you are using.
- For production environments, it's highly recommended to use Kerberos or NTLM with WinRM over HTTPS for secure authentication and encryption.
By following these steps, you should have a Windows Server ready to be managed by Ansible.
Remote install / fleet deployments
To remotely set up a Windows Server to be managed by Ansible, you need to configure WinRM (Windows Remote Management) on the target server. This process can be challenging since it ideally requires remote execution of a configuration script on the Windows server. If you have physical access or remote desktop (RDP) access to the server, it's usually easier to set up WinRM directly. However, if you need to do this entirely remotely, here are some methods you can consider:
1. Using PowerShell Remoting
If PowerShell Remoting is already enabled on the target server, you can use it to configure WinRM for Ansible.
-
Connect to the Windows Server via PowerShell Remoting:
$credential = Get-Credential Enter-PSSession -ComputerName <Target-Server-IP-or-Hostname> -Credential $credential -
Run the Ansible WinRM Configuration Script: Download and execute the
ConfigureRemotingForAnsible.ps1script within the remote session.Invoke-WebRequest -Uri "https://raw.githubusercontent.com/ansible/ansible-documentation/devel/examples/scripts/ConfigureRemotingForAnsible.ps1" -OutFile "ConfigureRemotingForAnsible.ps1" .\ConfigureRemotingForAnsible.ps1 -
Exit the Remote Session:
Exit-PSSession
2. Using Group Policy (For Domain-Joined Servers)
If the server is part of an Active Directory domain, you can use Group Policy to configure WinRM on multiple servers at once.
- Create a new GPO in your Group Policy Management Console.
- Edit the GPO to include the WinRM service configuration. Typically, you need to set up the service to start automatically and configure the listener for HTTP and/or HTTPS.
- Link the GPO to an OU that contains your servers.
3. Using a Configuration Management Tool
If you have a configuration management tool like SCCM (System Center Configuration Manager), you can use it to push out a script or configuration to enable and configure WinRM on Windows servers.
4. Using a Remote Execution Tool
If you have access to a remote execution tool like PSExec (part of Sysinternals), you can use it to run commands or scripts on the remote Windows server.
For example:
psexec \\target-server -u username -p password -h powershell.exe -ExecutionPolicy Bypass -File ConfigureRemotingForAnsible.ps1
Security Considerations
- When setting up WinRM, especially over HTTP, be aware of security implications. HTTP traffic is not encrypted, which can expose sensitive data. For production environments, HTTPS with certificate-based authentication is recommended.
- Ensure that the WinRM service is properly secured and accessible only from trusted networks or hosts.
Testing the Setup
After setting up WinRM, test the connection from your Ansible control machine:
ansible windows -i inventory_file -m win_ping
Replace inventory_file with the path to your Ansible inventory file where your Windows host is defined.
Conclusion
The method you choose depends on your current infrastructure, the tools you have available, and your access level to the Windows Server. For security and simplicity, direct access (like RDP) to set up WinRM is generally preferred, but in environments where this is not feasible, remote methods are necessary.
Citrix Virtual Apps and Desktops
Export and Import Policies
Exporting the Policy
Complete the following procedure to export the policy:
-
From the Desktop Delivery Controller as an Administrator role account.
-
Open PowerShell :
Add-PSSnapin Citrix* -
Export-BrokerDesktopPolicy | Out-File -FilePath "C:\Temp\CitrixExportPolicy.txt"
The preceding commands exports the policy to a binary file.
Importing the Policy
Complete the following procedure to import the policy:
-
From the Desktop Delivery Controller as an Administrator role account.
-
Open PowerShell :
Add-PSSnapin Citrix* -
Import-BrokerDesktopPolicy (Get-Content "C:\Temp\CitrixExportPolicy.txt")
Intro to Citrix
Lifecycle
Current Releases will reach End of Maintenance 6 months after the release date. Current Release. Current Releases will reach End of Life 18 months after the release date.
A Long Term Service Release will reach End of Life 5 years after the release date. A Long Term Service Release will reach End of Extended Support 10 years after the release date.
Upgrading Client VDA
To upgrade VDAs installed on machines running Windows 8.x or Window 7 to Windows 10, Citrix recommends reimaging Windows 7 and Windows 8.x machines to Windows 10 and then installing the supported VDA for Windows 10. If reimaging is not an option, uninstall the VDA before upgrading the operating system; otherwise, the VDA will be in an unsupported state.
Upgrading Components
Upgrade procedure
Insert the installation media or mount the ISO drive for the new release. Double-click AutoSelect.
To use the command-line interface, see Install using the command line.
- Install more than one core component is installed on the same server (for example, the Controller, Studio, and License Server) and several of those components have new versions available, they will all be upgraded when you run the installer on that server.
If any core components are installed on machines other than the Controller, run the installer on each of those machines. The recommended order is: License Server, StoreFront, and then Director.
- Run the product installer on machines containing VDAs. (See Step 9 for master images and Machine Creation Services.)
- If Studio is installed on a different machine than one you’ve already upgraded, run the installer on the machine where Studio is installed.
- From the newly upgraded Studio, upgrade the Site database.
- From the newly upgraded Studio, select Citrix Studio site-name in the navigation pane. Select the Common Tasks Select Upgrade remaining Delivery Controllers.
- After completing the upgrade close and then reopen Studio. Studio might prompt for an additional Site upgrade.
- In the Site Configuration section of the Common Tasks page, select Perform registration. Registering the Controllers makes them available to the Site.
- After upgrading components, the database, and the Site, test the newly-upgraded Site. From Studio, select Citrix Studio site-name in the navigation pane. Select the Common Tasks tab and then select Test Site. These tests were run automatically after you upgraded the database, but you can run them again at any time.
- After you upgrade and test the deployment, update the VDA used in the master images (if you haven’t done that already). Update master images that use those VDAs. See Update or create a new master image. Then update machine catalogs that use those master images, and upgrade Delivery Groups that use those catalogs.
Upgrading the Site and Database
Upgrade Steps
After upgrading the core components and VDAs, use the newly upgraded Studio to initiate an automatic or manual database and Site upgrade.
Remember: Check the Preparation section above for permission requirements.
- For an automatic database upgrade, the Studio user’s permissions must include the ability to update the SQL Server database schema.
- For a manual upgrade, the Studio user runs some of the generated scripts from Studio. The database administrator runs other scripts, using either the SQLCMD utility or the SQL Server Management Studio in SQLCMD mode. Otherwise, inaccurate errors can result.
Citrix strongly recommends that you back up the database before upgrading. See CTX135207. During a database upgrade, product services are disabled. During that time, Controllers cannot broker new connections for the site, so plan carefully.
After the database upgrade completes and product services are enabled, Studio tests the environment and configuration, and then generates an HTML report. If problems are identified, you can restore the database backup. After resolving issues, you can upgrade the database again.
Upgrade the database and site automatically:
Launch the newly upgraded Studio. After you choose to start the site upgrade automatically and confirm that you are ready, the database and site upgrade proceeds.
Identity and Access Management
Foreman Smart Proxy - FreeIPA DNS
The SmartProxy DNS module can update any DNS server that complies with the ISC Dynamic DNS Update standard. Updates can also be made using GSS-TSIG, additional providers are available for managing libvirt’s embedded DNS server, and Microsoft Active Directory using dnscmd, for static DNS records.
This guide will focus on FreeIPA and kerberos for SmartProxy DNS management.
FreeIPA configuration
A service principal is required for the Smart Proxy
foremanproxy/proxy.example.com@EXAMPLE.COM.
Create a new service principal for the SmartProxy. On any IPA server or controller node:
ipa service-add foremanproxy/proxy.example.com@EXAMPLE.COM.
On the SmartProxy host, get the keytab file
ipa-getkeytab -p foremanproxy/proxy.example.com@EXAMPLE.COM -s ipa-server.example.com -k /etc/foreman-proxy/dns.keytab
Set permissions and owner for the keytab.
chmod 0600 /etc/foreman-proxy/dns.keytab && chown foreman-proxy /etc/foreman-proxy/dns.keytab
In the FreeIPA web UI, go to the DNS zone, then to the Settings tab, verify that “Dynamic update” is set to “True”, and add the following to the BIND update policy a new grant:
grant foremanproxy\047proxy.example.com@EXAMPLE.COM wildcard * ANY;
ACLs should be updated for both forward and reverse zones.
Note the \047 is written verbatim, and don’t forget the semicolon.
Proxy configuration
Update the proxy DNS configuration file (/etc/foreman-proxy/settings.d/dns.yml) with the following setting:
:use_provider: dns_nsupdate_gss
And the DNS GSS configuration file (/etc/foreman-proxy/settings.d/dns_nsupdate_gss.yml) with:
:dns_server: 127.0.0.1 or ip of DNS
:dns_tsig_keytab: /etc/foreman-proxy/dns.keytab
:dns_tsig_principal: foremanproxy/proxy.example.com@EXAMPLE.COM
Ensure the dns_key setting is not specified, or is commented out.
Restart the smart proxy service.
systemctl restart foreman-proxy
check the log file for any errors or warnings.
tail -fn100 /var/log/foreman-proxy/proxy.log
Update Foreman
After adding a Smart Proxy plugin, you must instruct Foreman to rescan the configuration.
In Foreman, Go to the Smart Proxies Use the Actions drop-down menu and select “Refresh Features” .
Add the Smart Proxy as a DNS proxy on the subnets and domains as needed.
IPA - Basic Commands
A basic list of command to manage FreeIPA services.
DNS
Add new a record and reverse record.
An A record is used to map an FQDN to an IP address. The A record is created using the following:
ipa dnsrecord-add <forward-zone> <short-name> --a-rec <IP of A record>
The reverse, or pointer, record is used to map the IP to a hostname. The command to create a pointer is:
ipa dnsrecord-add <reverse-zone> <num> --ptr-rec <host-FQDN>.
Note the trailing dot. This is very important.
This is an example of adding server1.i.example.com with the IP of 192.168.4.11 to the FreeIPA DNS.
ipa dnsrecord-add i.example.com  server1 --a-rec 192.168.4.11
ipa dnsrecord-add 4.168.192.in-addr.arpa 11 --ptr-rec server1.i.example.com.
Hosts
Remove a failed or dead host.
ipa host-del server1 --updatednsIncluding the --updatedns option will also remove all of the linked DNS entries for this host.
Services
The service must include the service / FQDN of the host.
ipa service-add nfs/server1.i.example.comUsers
Add a new user lab1
ipa user-add lab1Change the new user's password
ipa passwd lab1IPA - Fast and Dirty
This guide explains how to deploy FreeIPA the quickest way possible.
This is not for production.
You will need a fresh install of CentOS 7. The latest edition will be fine.
As root, update the server and install the requirements.
yum update -y
yum install -y ipa-server bind-dyndb-ldap ipa-server-dns
Open the firewall ports and reload the firewall.
firewall-cmd --permanent --add-service={http,https,ftp,ldap,ldaps,kerberos,kpasswd,dns,ntp}
firewall-cmd --reload
Run the IPA Server install.
ipa-server-install --setup-dns --allow-zone-overlap
kinit admin
Follow the install prompts. Answer each item. If you don't know, choose the default option.
kinit admin
<enter password entered durring ipa setup>
klist # to view the ticket.
Check the IPA Server status.
ipactl statusExample:
# ipactl status
Directory Service: RUNNING
krb5kdc Service: RUNNING
kadmin Service: RUNNING
named Service: RUNNING
ipa_memcached Service: RUNNING
httpd Service: RUNNING
pki-tomcatd Service: RUNNING
ipa-otpd Service: RUNNING
ipa: INFO: The ipactl command was successful
If there were no errors, then you have a running IPA Server. Log in to the IPA server to begin management tasks. To use the web interface go to https://<fqdn of the IPA server.
To setup a simple method for transferring the CA certificate is ftp. In this example vsftpd is used. The firewall ports were already opened during the IPA setup.
yum install -y vsftpd
systemctl enable --now vsftpd # or systemctl enable vsftpd; systemctl start vsftpd
cp /etc/ipa/ca.crt /var/ftp/pub
Now non-IPA clients will be able to securely access the LDAP. Add this certificate to web browsers or other application to trust web services that use the IPA sever as a CA.
Oracle Things
APEX on Docker
docker network create oradocker run --name oracledb \
--network=ora \
-p 1521:1521 \
-p 5500:5500 \
-v ~/oradata:/opt/oracle/oradata \
-v ~/apex/images/apex:/tmp/apex_install \
-e TZ=America/New_York \oracle/database:18.3.0-se2docker exec oracledb ./setPassword.sh Oradoc_db1# Install and configure APEXdocker exec -it oracledb bash -c "source /home/oracle/.bashrc; bash"cd /tmp/apex-installsqlplus sys/Oradoc_db1@localhost/orclpdb1 as sysdba-- Install APEX@apexins.sql SYSAUX SYSAUX TEMP /i/-- APEX REST configuration@apex_rest_config_core.sql oracle oraclealter user apex_public_user identified by oracle account unlock;-- From the blog: "Create a network ACE for APEX (this is used when consuming Web services or sending outbound mail):"
declare
l_acl_path varchar2(4000);
l_apex_schema varchar2(100);
begin
for c1 in (select schema
from sys.dba_registry
where comp_id = 'APEX') loop
l_apex_schema := c1.schema;
end loop;
sys.dbms_network_acl_admin.append_host_ace(
host => '*',
ace => xs$ace_type(privilege_list => xs$name_list('connect'),
principal_name => l_apex_schema,
principal_type => xs_acl.ptype_db));
commit;
end;
/
begin
apex_util.set_security_group_id( 10 );
apex_util.create_user(
p_user_name => 'ADMIN',
p_email_address => 'systems@example.com',
p_web_password => 'oracle',
p_developer_privs => 'ADMIN' );
apex_util.set_security_group_id( null );
commit;
end;
/-- Exit SQLexit
#### ORDS
-- Assuming that you have a folder called ~/docker/ordscd ~/docker/ords
git clone https://github.com/martindsouza/docker-ords.git
cd docker-ords
-- Extract the ords.war file from the ords.zip downloadunzip ~/Downloads/ords.*.zip ords.warcd ~/ords/docker-ords
ORDS_VERSION=18.3.0
docker build -t ords:$ORDS_VERSION .docker run --name ords\
--network=ora \
-e TZ=America/New_York \
-e DB_HOSTNAME=oracledb \
-e DATABASE_SERVICENAME="orclpdb1" \
-e DB_PORT=1521 \
-e APEX_PUBLIC_USER_PASS=oracle \
-e APEX_LISTENER_PASS=oracle \
-e APEX_REST_PASS=oracle \
-e ORDS_PASS=oracle \
-e SYS_PASS=Oradoc_db1 \
--volume ~/ords/ords-18.3.0/config:/opt/ords \
--volume ~/apex/images/apex/images:/ords/apex-images \
-p 8080:8080 \
ords:18.3.0
docker run -t -i \
--name ords \
--network=ora \
-e DATABASE_HOSTNAME="oracledb" \
-e DATABASE_PORT="1521" \
-e DATABASE_SERVICENAME="ORCLPDB1" \
-e DATABASE_PUBLIC_USER_PASS=oracle \
-e APEX_LISTENER_PASS=oracle \
-e APEX_REST_PASS=oracle \
-e ORDS_PASS=oracle \
--volume ~/apex/images:/usr/local/tomcat/webapps/i \
-p 8080:8080 \
lucassampsouza/ords_apex:3.0.9OCI CLI setup
Setup OCI
You'll need a terminal and a browser. Log in to OCI and go to your profile. You'll need the user OCID and the tenant OCID. Note the region you are in.
Install oci
- Oracle Linux 8
sudo dnf -y install oraclelinux-developer-release-el8
sudo dnf install python36-oci-cli
- Other Linux
bash -c "$(curl -L https://raw.githubusercontent.com/oracle/oci-cli/master/scripts/install/install.sh)"
- MacOS
brew upgrade && brew update && brew install oci-cli
- Windows
lol. No. Get a Linux box or use WSL.
Configure
At the command line:
oci setup config
In a browser open the OCI console copy the user OCID.
Open the Profile menu (User menu icon) and click User Settings.
Copy the user OCID and return to the command line. Paste the user OCID at the User OCID prompt and hit return.
Return to the OCI console and navigate to Administration > Tenancy Details. In the Tenancy Information tab, click Copy to copy the OCID.
Return to the command line and paste the value at the OICD prompt and hit return.
Enter the associated region, hit enter.
Generate or enter the path to the private PEM file. For example, ~/.oci/oci_api_key.pem If required, enter the passphrase used with the key. Enter y or no to the prompt asking about whether to store the passphrase.
The configuration process is complete.
Oracle Database 19c EE
Download the following software:
OS setup
Install Oracle Linux 7. Select Server with a GUI. or Minimal.
As the root user, configure the OS and create the directory structure.
yum install -y oracle-database-preinstall-19c wget
mkdir -p /u01/app/oracle/product/19.0.0/dbhome_1
mkdir -p /u02/oradata
chown -R oracle:oinstall /u01 /u02
chmod -R 775 /u01 /u02
Database installation.
As the oracle user:
Make a scripts folder
mkdir /home/oracle/scripts
Create an environment script. This will hold all of the settings.
cat > /home/oracle/scripts/setEnv.sh <<EOF
# Oracle Settings
export TMP=/tmp
export TMPDIR=\$TMP
export ORACLE_HOSTNAME=ora19c.core.example.com
export ORACLE_UNQNAME=cdb1
export ORACLE_BASE=/u01/app/oracle
export ORACLE_HOME=\$ORACLE_BASE/product/19.0.0/dbhome_1
export ORA_INVENTORY=/u01/app/oraInventory
export ORACLE_SID=cdb1
export PDB_NAME=pdb1
export DATA_DIR=/u02/oradata
export PATH=/usr/sbin:/usr/local/bin:\$PATH
export PATH=\$ORACLE_HOME/bin:\$PATH
export LD_LIBRARY_PATH=\$ORACLE_HOME/lib:/lib:/usr/lib
export CLASSPATH=\$ORACLE_HOME/jlib:\$ORACLE_HOME/rdbms/jlib
EOF
Add the contents of setEnv.sh to Oracle's .bash_profile.
echo ". /home/oracle/scripts/setEnv.sh" >> /home/oracle/.bash_profile
Create a start script.
cat > /home/oracle/scripts/start_all.sh <<EOF
#!/bin/bash
. /home/oracle/scripts/setEnv.sh

export ORAENV_ASK=NO
. oraenv
export ORAENV_ASK=YES

dbstart \$ORACLE_HOME
EOF
Create a stop script.
cat > /home/oracle/scripts/stop_all.sh <<EOF
#!/bin/bash
. /home/oracle/scripts/setEnv.sh

export ORAENV_ASK=NO
. oraenv
export ORAENV_ASK=YES

dbshut \$ORACLE_HOME
EOF
Set the owner and folder and execute on the scripts.
chown -R oracle:oinstall /home/oracle/scripts
chmod u+x /home/oracle/scripts/*.sh
Load the environment.
source /home/oracle/.bash_profile
Unzip the installer.
cd $ORACLE_HOME
unzip -oq /tmp/LINUX.X64_193000_db_home.zip
Run the installer.
./runInstaller -ignorePrereq -waitforcompletion -silent                        \
    -responseFile ${ORACLE_HOME}/install/response/db_install.rsp               \
    oracle.install.option=INSTALL_DB_SWONLY                                    \
    ORACLE_HOSTNAME=${ORACLE_HOSTNAME}                                         \
    UNIX_GROUP_NAME=oinstall                                                   \
    INVENTORY_LOCATION=${ORA_INVENTORY}                                        \
    SELECTED_LANGUAGES=en,en_US                                                \
    ORACLE_HOME=${ORACLE_HOME}                                                 \
    ORACLE_BASE=${ORACLE_BASE}                                                 \
    oracle.install.db.InstallEdition=EE                                        \
    oracle.install.db.OSDBA_GROUP=dba                                          \
    oracle.install.db.OSBACKUPDBA_GROUP=dba                                    \
    oracle.install.db.OSDGDBA_GROUP=dba                                        \
    oracle.install.db.OSKMDBA_GROUP=dba                                        \
    oracle.install.db.OSRACDBA_GROUP=dba                                       \
    SECURITY_UPDATES_VIA_MYORACLESUPPORT=false                                 \
    DECLINE_SECURITY_UPDATES=true
As a root user, execute the following:
/u01/app/oraInventory/orainstRoot.sh
/u01/app/oracle/product/19.0.0/dbhome_1/root.sh
As the oracle user:
Start the listener
lsnrctl start
Create the first database.
dbca -silent -createDatabase                                                   \
     -templateName General_Purpose.dbc                                         \
     -gdbname ${ORACLE_SID} -sid  ${ORACLE_SID} -responseFile NO_VALUE         \
     -characterSet AL32UTF8                                                    \
     -sysPassword Som3bTt3rpwd                                                 \
     -systemPassword Som3bTt3rpwd                                              \
     -createAsContainerDatabase true                                           \
     -numberOfPDBs 1                                                           \
     -pdbName ${PDB_NAME}                                                      \
     -pdbAdminPassword Som3bTt3rpwd                                            \
     -databaseType MULTIPURPOSE                                                \
     -automaticMemoryManagement false                                          \
     -totalMemory 2000                                                         \
     -storageType FS                                                           \
     -datafileDestination "${DATA_DIR}"                                        \
     -redoLogFileSize 50                                                       \
     -emConfiguration NONE                                                     \
     -ignorePreReqs
Edit the "/etc/oratab" file setting the restart flag for each instance to 'Y'.
Example:
cdb1:/u01/app/oracle/product/19.0.0/db_1:Y
Enable Oracle Managed Files and make the PDB start when the instance starts
sqlplus / as sysdba <<EOF
alter system set db_create_file_dest='/u02/oradata';
alter pluggable database pdb1 save state;
exit;
EOF
APEX
As the oracle user:
Make the apex directory and unzip the apex files.
mkdir -p /home/oracle/apex
unzip /tmp/apex_20.*.zip -d /home/oracle
chown -R oracle:oinstall /home/oracle/apex
cd /home/oracle/apex
Create an ACL script. This will be needed later.
cat > apex_acl.sql << EOF
BEGIN
  BEGIN
    dbms_network_acl_admin.drop_acl(acl => 'all-network-PUBLIC.xml');
  EXCEPTION
    WHEN OTHERS THEN
      NULL;
  END;
  dbms_network_acl_admin.create_acl(acl         => 'all-network-PUBLIC.xml',
                                    description => 'Allow all network traffic',
                                    principal   => 'PUBLIC',
                                    is_grant    => TRUE,
                                    privilege   => 'connect');
  dbms_network_acl_admin.add_privilege(acl       => 'all-network-PUBLIC.xml',
                                       principal => 'PUBLIC',
                                       is_grant  => TRUE,
                                       privilege => 'resolve');
  dbms_network_acl_admin.assign_acl(acl  => 'all-network-PUBLIC.xml',
                                    host => '*');
END;
/
sho err
COMMIT;
/
EOF
Connect to the database
sqlplus /nolog
Change roles
CONN pdb1 AS SYSDBA
alter session set container=PDB1;
Run the script to install a full development environment
@apexins.sql SYSAUX SYSAUX TEMP /i/
Create an instance administrator user and set their password
@apxchpwd.sql
Configure REST Data Services
@apex_rest_config.sql
Run the ACL setup script created earlier.
@apex_acl.sql
Unlock APEX users
ALTER USER APEX_PUBLIC_USER ACCOUNT UNLOCK;
ALTER USER APEX_PUBLIC_USER IDENTIFIED BY "Som3bTt3rpwd";
ALTER USER APEX_REST_PUBLIC_USER IDENTIFIED BY "Som3bTt3rpwd" ACCOUNT UNLOCK;
ALTER USER APEX_LISTENER IDENTIFIED BY "Som3bTt3rpwd" ACCOUNT UNLOCK;
Oracle Database 21c
Download the following software:
NOTICE
This is a very basic install. It should only be used as a guide.
OS setup
Install Oracle Linux 8. "Minimal" installation.
As the root user, configure the OS and create the required directory structure.
dnf install -y oracle-database-preinstall-21c wget
mkdir -p /u01/app/oracle/product/21.0.0/dbhome_1
mkdir -p /u02/oradata
chown -R oracle:oinstall /u01 /u02
chmod -R 775 /u01 /u02
Database installation
As the oracle user:
Create a scripts folder:
mkdir /home/oracle/scripts
Create an environment script. This will hold all the necessary settings.
cat > /home/oracle/scripts/setEnv.sh <<EOF
# Oracle Settings
export TMP=/tmp
export TMPDIR=\$TMP
export ORACLE_HOSTNAME=ora21c.example.com
export ORACLE_UNQNAME=cdb1
export ORACLE_BASE=/u01/app/oracle
export ORACLE_HOME=\$ORACLE_BASE/product/21.0.0/dbhome_1
export ORA_INVENTORY=/u01/app/oraInventory
export ORACLE_SID=cdb1
export PDB_NAME=pdb1
export DATA_DIR=/u02/oradata
export PATH=/usr/sbin:/usr/local/bin:\$PATH
export PATH=\$ORACLE_HOME/bin:\$PATH
export LD_LIBRARY_PATH=\$ORACLE_HOME/lib:/lib:/usr/lib
export CLASSPATH=\$ORACLE_HOME/jlib:\$ORACLE_HOME/rdbms/jlib
EOF
Add the contents of setEnv.sh to Oracle's .bash_profile.
echo ". /home/oracle/scripts/setEnv.sh" >> /home/oracle/.bash_profile
Create a start script.
cat > /home/oracle/scripts/start_all.sh <<EOF
#!/bin/bash
. /home/oracle/scripts/setEnv.sh

export ORAENV_ASK=NO
. oraenv
export ORAENV_ASK=YES

dbstart \$ORACLE_HOME
EOF
Create a stop script.
cat > /home/oracle/scripts/stop_all.sh <<EOF
#!/bin/bash
. /home/oracle/scripts/setEnv.sh

export ORAENV_ASK=NO
. oraenv
export ORAENV_ASK=YES

dbshut \$ORACLE_HOME
EOF
Set the owner and permissions for the scripts.
chown -R oracle:oinstall /home/oracle/scripts
chmod u+x /home/oracle/scripts/*.sh
Load the environment.
source /home/oracle/.bash_profile
Unzip the database installer.
cd $ORACLE_HOME
unzip -oq /tmp/LINUX.X64_210000_db_home.zip
Run the installer.
./runInstaller -ignorePrereq -waitforcompletion -silent                        \
    -responseFile ${ORACLE_HOME}/install/response/db_install.rsp               \
    oracle.install.option=INSTALL_DB_SWONLY                                    \
    ORACLE_HOSTNAME=${ORACLE_HOSTNAME}                                         \
    UNIX_GROUP_NAME=oinstall                                                   \
    INVENTORY_LOCATION=${ORA_INVENTORY}                                        \
    SELECTED_LANGUAGES=en,en_US                                                \
    ORACLE_HOME=${ORACLE_HOME}                                                 \
    ORACLE_BASE=${ORACLE_BASE}                                                 \
    oracle.install.db.InstallEdition=EE                                        \
    oracle.install.db.OSDBA_GROUP=dba                                          \
    oracle.install.db.OSBACKUPDBA_GROUP=dba                                    \
    oracle.install.db.OSDGDBA_GROUP=dba                                        \
    oracle.install.db.OSKMDBA_GROUP=dba                                        \
    oracle.install.db.OSRACDBA_GROUP=dba                                       \
    SECURITY_UPDATES_VIA_MYORACLESUPPORT=false                                 \
    DECLINE_SECURITY_UPDATES=true
As a root user, execute the following:
/u01/app/oraInventory/orainstRoot.sh
/u01/app/oracle/product/21.0.0/dbhome_1/root.sh
As the oracle user:
Start the listener.
lsnrctl start
Create the database.
dbca -silent -createDatabase                                                   \
     -templateName General_Purpose.dbc                                         \
     -gdbname ${ORACLE_SID} -sid  ${ORACLE_SID} -responseFile NO_VALUE         \
     -characterSet AL32UTF8                                                    \
     -sysPassword Som3bTt3rpwd                                                 \
     -systemPassword Som3bTt3rpwd                                              \
     -createAsContainerDatabase true                                           \
     -numberOfPDBs 1                                                           \
     -pdbName ${PDB_NAME}                                                      \
     -pdbAdminPassword Som3bTt3rpwd                                            \
     -databaseType MULTIPURPOSE                                                \
     -automaticMemoryManagement false                                          \
     -totalMemory 2000                                                         \
     -storageType FS                                                           \
     -datafileDestination "${DATA_DIR}"                                        \
     -redoLogFileSize 50                                                       \
     -emConfiguration NONE                                                     \
     -ignorePreReqs
Edit the /etc/oratab file setting the restart flag for each instance to 'Y'.
Example:
cdb1:/u01/app/oracle/product/21.0.0/db_1:Y
Enable Oracle Managed Files and make the PDB start when the instance starts.
sqlplus / as sysdba <<EOF
alter system set db_create_file_dest='/u02/oradata';
alter pluggable database pdb1 save state;
exit;
EOF
Oracle Enterprise Manager 13.5 on OL8
Oracle Enterprise Manager Cloud Control 13c on Oracle Linux 8
Step 1: Download Required Software
First, ensure you have downloaded the necessary software from Oracle’s official website:
- Oracle Linux 8 ISO from Oracle Linux Download
- Oracle Database 19c (or latest) from Oracle Database Downloads
- Oracle Enterprise Manager Cloud Control 13c Release 5 (or latest) from Enterprise Manager Downloads
Step 2: Install Oracle Linux 8
- Install Oracle Linux 8: Boot from the Oracle Linux 8 ISO and follow the installation prompts. If a GUI is needed, make sure to select the "Workstation" or "Server with GUI" base environment during installation.
- Set Up Network and Hostname: Configure your network settings and hostname during or after installation as required.
Step 3: Prepare the Operating System
-
Update the System: Ensure your system is up-to-date.
dnf update -y -
Install Required Packages: The
oracle-database-preinstall-19cpackage will automatically install dependencies and configure system parameters.dnf install -y oracle-database-preinstall-19c wget -
Additional Dependencies: If there are specific additional dependencies for Oracle Database 19c or the Enterprise Manager, install them as needed.
Step 4: Configure System Settings and Users
-
Directory Structure: Create directories for Oracle software and data files.
mkdir -p /u01/app/oracle/product/19.0.0/dbhome_1 mkdir -p /u01/app/oracle/middleware mkdir -p /u01/app/oracle/agent mkdir -p /u01/tmp mkdir -p /u01/oradata chown -R oracle:oinstall /u01 chmod -R 775 /u01 -
Environment Variables: As the
oracleuser, configure environment variables.- Create a script
/home/oracle/scripts/setEnv.shwith the following content:
export TMP=/tmp export TMPDIR=$TMP export ORACLE_HOSTNAME=<your_hostname> export ORACLE_UNQNAME=emcdb export ORACLE_BASE=/u01/app/oracle export ORACLE_HOME=$ORACLE_BASE/product/19.0.0/dbhome_1 export ORACLE_SID=emcdb export PATH=/usr/sbin:/usr/local/bin:$PATH export PATH=$ORACLE_HOME/bin:$PATH export LD_LIBRARY_PATH=$ORACLE_HOME/lib:/lib:/usr/lib export CLASSPATH=$ORACLE_HOME/jlib:$ORACLE_HOME/rdbms/jlib export OMS_HOME=/u01/app/oracle/middleware export AGENT_HOME=/u01/app/oracle/agent/agent_inst export MW_HOME=${ORACLE_BASE}/middleware export OMS_HOME=${MW_HOME} export GC_INST=${ORACLE_BASE}/gc_inst export AGENT_BASE=${ORACLE_BASE}/agent- Add the script to the oracle user’s
.bash_profile.
echo ". /home/oracle/scripts/setEnv.sh" >> /home/oracle/.bash_profile - Create a script
Step 5: Install Oracle Database
-
Prepare the Database Installation: Unzip the Oracle Database software and prepare a response file for a silent installation.
mkdir /u01/software/ cd /u01/software unzip <path_to_your_downloaded_db_software>.zip cd database -
Run the Database Installer: Execute the silent installation using parameters.
./runInstaller -ignorePrereq -waitforcompletion -silent \ -responseFile ${ORACLE_HOME}/install/response/db_install.rsp \ oracle.install.option=INSTALL_DB_SWONLY \ ORACLE_HOSTNAME=${ORACLE_HOSTNAME} \ UNIX_GROUP_NAME=oinstall \ INVENTORY_LOCATION=${ORA_INVENTORY} \ SELECTED_LANGUAGES=en,en_US \ ORACLE_HOME=${ORACLE_HOME} \ ORACLE_BASE=${ORACLE_BASE} \ oracle.install.db.InstallEdition=EE \ oracle.install.db.OSDBA_GROUP=dba \ oracle.install.db.OSBACKUPDBA_GROUP=dba \ oracle.install.db.OSDGDBA_GROUP=dba \ oracle.install.db.OSKMDBA_GROUP=dba \ oracle.install.db.OSRACDBA_GROUP=dba \ SECURITY_UPDATES_VIA_MYORACLESUPPORT=false \ DECLINE_SECURITY_UPDATES=true -
Configure the Listener and Database: Use the
netcaanddbcatools to configure the network and create the database, respectively. These can be automated with response files or command-line options for silent operations.Start the listener:
lsnrctl startCreate the database:
dbca -silent -createDatabase \ -templateName General_Purpose.dbc \ -gdbname ${ORACLE_SID} -sid ${ORACLE_SID} -responseFile NO_VALUE \ -characterSet AL32UTF8 \ -sysPassword Som3bTt3rpwd \ -systemPassword Som3bTt3rpwd \ -createAsContainerDatabase true \ -numberOfPDBs 1 \ -pdbName ${PDB_NAME} \ -pdbAdminPassword Som3bTt3rpwd \ -databaseType MULTIPURPOSE \ -automaticMemoryManagement false \ -totalMemory 8000 \ -storageType FS \ -datafileDestination "${DATA_DIR}" \ -redoLogFileSize 50 \ -emConfiguration NONE \ -ignorePreReqs -
Set the pluggable database to auto-start.
sqlplus / as sysdba <<EOF
alter system set db_create_file_dest='/u01/oradata';
alter pluggable database emrep save state;

-- Recommended settings
alter system set "_allow_insert_with_update_check"=true scope=both;
alter system set session_cached_cursors=200 scope=spfile;
alter system set sga_target=800M scope=both;
alter system set pga_aggregate_target=450M scope=both;

EOF
Step 6: Install Oracle Enterprise Manager Cloud Control
- Prepare for Installation: Unzip
the Enterprise Manager software to /u01/software/em and navigate to the directory.
-
Enterprise Manager Install Response File: Similar to the database, prepare a response file for the Enterprise Manager installation.
Setup the environment:
 export ORA_INVENTORY=/u01/app/oraInventory
 export PDB_NAME=emrep
 export SYS_PASSWORD=SysAdminpW1
 export UNIX_GROUP_NAME=oinstall
 export MW_HOME=${ORACLE_BASE}/middleware
 export OMS_HOME=${MW_HOME}
 export GC_INST=${ORACLE_BASE}/gc_inst
 export AGENT_BASE=${ORACLE_BASE}/agent
 export WLS_USERNAME=weblogic
 export WLS_PASSWORD=SysAdminpW1
 export SYSMAN_PASSWORD=${WLS_PASSWORD}
 export AGENT_PASSWORD=${WLS_PASSWORD}
 export SOFTWARE_LIBRARY=${ORACLE_BASE}/swlib
 export DATABASE_HOSTNAME=localhost
 export LISTENER_PORT=1521
 export SOFTWARE_DIR=/u01/software/em
Create the responce file:
cat > /tmp/install.rsp <<EOF RESPONSEFILE_VERSION=2.2.1.0.0 UNIX_GROUP_NAME=${UNIX_GROUP_NAME} INVENTORY_LOCATION=${ORA_INVENTORY} SECURITY_UPDATES_VIA_MYORACLESUPPORT=false DECLINE_SECURITY_UPDATES=true INSTALL_UPDATES_SELECTION=skip ORACLE_MIDDLEWARE_HOME_LOCATION=${MW_HOME} ORACLE_HOSTNAME=${ORACLE_HOSTNAME} AGENT_BASE_DIR=${AGENT_BASE} WLS_ADMIN_SERVER_USERNAME=${WLS_USERNAME} WLS_ADMIN_SERVER_PASSWORD=${WLS_PASSWORD} WLS_ADMIN_SERVER_CONFIRM_PASSWORD=${WLS_PASSWORD} NODE_MANAGER_PASSWORD=${WLS_PASSWORD} NODE_MANAGER_CONFIRM_PASSWORD=${WLS_PASSWORD} ORACLE_INSTANCE_HOME_LOCATION=${GC_INST} CONFIGURE_ORACLE_SOFTWARE_LIBRARY=true SOFTWARE_LIBRARY_LOCATION=${SOFTWARE_LIBRARY} DATABASE_HOSTNAME=${DATABASE_HOSTNAME} LISTENER_PORT=${LISTENER_PORT} SERVICENAME_OR_SID=${PDB_NAME} SYS_PASSWORD=${SYS_PASSWORD} SYSMAN_PASSWORD=${SYSMAN_PASSWORD} SYSMAN_CONFIRM_PASSWORD=${SYSMAN_PASSWORD} DEPLOYMENT_SIZE=SMALL AGENT_REGISTRATION_PASSWORD=${AGENT_PASSWORD} AGENT_REGISTRATION_CONFIRM_PASSWORD=${AGENT_PASSWORD} PLUGIN_SELECTION={} b_upgrade=false EM_INSTALL_TYPE=NOSEED CONFIGURATION_TYPE=LATER CONFIGURE_SHARED_LOCATION_BIP=false EOF -
Run the Installer: Execute the silent installation using the response file.
./em13500_linux64.bin silent -responseFile /tmp/install.rsp -J-Djava.io.tmpdir=/u01/tmp/ -
Post-Installation Steps:
At the end of a successful install, run the root script.
As root
sh ${MW_HOME}/allroot.shReturn to Oracle user
Create the the configuration response file..
cat > /tmp/config.rsp <<EOF
RESPONSEFILE_VERSION=2.2.1.0.0
UNIX_GROUP_NAME=${UNIX_GROUP_NAME}
INVENTORY_LOCATION=${ORA_INVENTORY}
SECURITY_UPDATES_VIA_MYORACLESUPPORT=false
DECLINE_SECURITY_UPDATES=true
INSTALL_UPDATES_SELECTION=skip
ORACLE_MIDDLEWARE_HOME_LOCATION=${MW_HOME}
ORACLE_HOSTNAME=${ORACLE_HOSTNAME}
AGENT_BASE_DIR=${AGENT_BASE}
WLS_ADMIN_SERVER_USERNAME=${WLS_USERNAME}
WLS_ADMIN_SERVER_PASSWORD=${WLS_PASSWORD}
WLS_ADMIN_SERVER_CONFIRM_PASSWORD=${WLS_PASSWORD}
NODE_MANAGER_PASSWORD=${WLS_PASSWORD}
NODE_MANAGER_CONFIRM_PASSWORD=${WLS_PASSWORD}
ORACLE_INSTANCE_HOME_LOCATION=${GC_INST}
CONFIGURE_ORACLE_SOFTWARE_LIBRARY=true
SOFTWARE_LIBRARY_LOCATION=${SOFTWARE_LIBRARY}
DATABASE_HOSTNAME=${DATABASE_HOSTNAME}
LISTENER_PORT=${LISTENER_PORT}
SERVICENAME_OR_SID=${PDB_NAME}
SYS_PASSWORD=${SYS_PASSWORD}
SYSMAN_PASSWORD=${SYSMAN_PASSWORD}
SYSMAN_CONFIRM_PASSWORD=${SYSMAN_PASSWORD}
DEPLOYMENT_SIZE=SMALL
AGENT_REGISTRATION_PASSWORD=${AGENT_PASSWORD}
AGENT_REGISTRATION_CONFIRM_PASSWORD=${AGENT_PASSWORD}
PLUGIN_SELECTION={}
b_upgrade=false
EM_INSTALL_TYPE=NOSEED
CONFIGURATION_TYPE=ADVANCED
CONFIGURE_SHARED_LOCATION_BIP=false
EOF
Run the configuration. This will take a very long time.
${MW_HOME}/sysman/install/ConfigureGC.sh -silent -responseFile /tmp/config.rsp
At the end of the installation you'll be provided a list of URLs and post-installation steps. Follow any post-installation steps such as deploying agents, as described in the Enterprise Manager documentation.
Step 7: Finalize Installation
- Start Services: Ensure that the Oracle database and the Enterprise Manager services are started.
- Verify Installation: Access the Enterprise Manager web interface to confirm that the installation was successful.
Notes:
- Response Files: The details on what to include in response files for both the database and Enterprise Manager can be found in the official Oracle documentation. These files control installation options, such as directories, components to install, and initial setup parameters.
-
Oracle Documentation: For detailed options for the
dbca,netca, and Enterprise Manager silent installation parameters, refer to Oracle's official documentation.
This guide outlines a general approach to installing Oracle Database and Oracle Enterprise Manager Cloud Control on Oracle Linux 8. Tailor the response files to your environment's specific needs, referring to Oracle's documentation for the most accurate and detailed instructions.
Oracle Enterprise Manager Cloud Control 13c
Download the following software:
- Oracle Linux 7 (x86_64)
- Oracle Database (x86_64) 12c, 18c or 19c Enterprise Edition
- Enterprise Manager Cloud Control 13c Release 3 (13.3.0.0) (x86_64)
OS Installation
Install Oracle Linux 7. Choose "Server with a GUI" during installation.
Do the following as root.
1. Install required packages
yum install oracle-database-server-12cR2-preinstall -y
yum install wget -y
yum install make -y
yum install binutils -y
yum install gcc -y
yum install libaio -y
yum install glibc-common -y
yum install libstdc++ -y
yum install sysstat -y
yum install glibc -y
yum install glibc-devel.i686 -y
yum install glibc-devel -y
yum install libXtst -y
2. Create the directory structures
mkdir -p /u01/app/oracle/product/12.2.0.1/db_1
mkdir -p /u01/app/oracle/middleware
mkdir -p /u01/app/oracle/agent
mkdir -p /u01/tmp
mkdir -p /u01/oradata
chown -R oracle:oinstall /u01
chmod -R 775 /u01
Database Installation
Do the following as the oracle user
1. Create a scripts directory.
mkdir /home/oracle/scripts
2. Create /home/oracle/scripts/setEnv.sh with the following contents:
export TMP=/tmp
export TMPDIR=$TMP

export ORACLE_HOSTNAME=oraem.servers-farm.io
export ORACLE_UNQNAME=emcdb
export ORACLE_BASE=/u01/app/oracle
export ORACLE_HOME=$ORACLE_BASE/product/12.2.0.1/db_1
export ORACLE_SID=emcdb

export PATH=/usr/sbin:/usr/local/bin:$PATH
export PATH=$ORACLE_HOME/bin:$PATH

export LD_LIBRARY_PATH=$ORACLE_HOME/lib:/lib:/usr/lib
export CLASSPATH=$ORACLE_HOME/jlib:$ORACLE_HOME/rdbms/jlib

export OMS_HOME=/u01/app/oracle/middleware
export AGENT_HOME=/u01/app/oracle/agent/agent_inst

export MW_HOME=${ORACLE_BASE}/middleware
export OMS_HOME=${MW_HOME}
export GC_INST=${ORACLE_BASE}/gc_inst
export AGENT_BASE=${ORACLE_BASE}/agent
3. Add the new script to your bash profile.
echo ". /home/oracle/scripts/setEnv.sh" >> /home/oracle/.bash_profile
4. Create a software folder and unzip the database.zip download in it.
mkdir /u01/software/
cd /u01/software
unzip ~/odb12c.zip
cd database
5. Run the silent database install.
./runInstaller -ignorePrereq -waitforcompletion -silent                                   \
               -responseFile /u01/software/database/response/db_install.rsp               \
               oracle.install.option=INSTALL_DB_SWONLY                                    \
               ORACLE_HOSTNAME=${HOSTNAME}                                                \
               UNIX_GROUP_NAME=oinstall                                                   \
               INVENTORY_LOCATION=/u01/app/oraInventory                                   \
               SELECTED_LANGUAGES=en,en_US                                               \
               ORACLE_HOME=${ORACLE_HOME}                                                 \
               ORACLE_BASE=${ORACLE_BASE}                                                 \
               oracle.install.db.InstallEdition=EE                                        \
               oracle.install.db.OSDBA_GROUP=dba                                          \
               oracle.install.db.OSBACKUPDBA_GROUP=dba                                    \
               oracle.install.db.OSDGDBA_GROUP=dba                                        \
               oracle.install.db.OSKMDBA_GROUP=dba                                        \
               oracle.install.db.OSRACDBA_GROUP=dba                                       \
               SECURITY_UPDATES_VIA_MYORACLESUPPORT=false                                 \
               DECLINE_SECURITY_UPDATES=true
6. Start the listener
lsnrctl start
7. Create the repository database
dbca -silent -createDatabase                                                    \
     -templateName General_Purpose.dbc                                          \
     -gdbname emcdb -sid emcdb -responseFile NO_VALUE                           \
     -characterSet AL32UTF8                                                     \
     -sysPassword SysAdminpW1                                                   \
     -systemPassword SysAdminpW1                                                \
     -createAsContainerDatabase true                                            \
     -numberOfPDBs 1                                                            \
     -pdbName emrep                                                             \
     -pdbAdminPassword SysAdminpW1                                              \
     -databaseType MULTIPURPOSE                                                 \
     -automaticMemoryManagement false                                           \
     -totalMemory 2000                                                          \
     -storageType FS                                                            \
     -datafileDestination /u01/oradata                                          \
     -redoLogFileSize 50                                                        \
     -emConfiguration NONE                                                      \
     -ignorePreReqs
8. Set the pluggable database to auto-start.
sqlplus / as sysdba <<EOF
  alter system set db_create_file_dest='/u01/oradata';
  alter pluggable database emrep save state;

  -- Recommended settings
  alter system set "_allow_insert_with_update_check"=true scope=both;
  alter system set session_cached_cursors=200 scope=spfile;
  alter system set sga_target=800M scope=both;
  alter system set pga_aggregate_target=450M scope=both;

  -- For 12.1.0.2
  alter system set optimizer_adaptive_features=false scope=both;
  exit;
EOF
Enterprise Manager Installation
Do the following as the oracle user.
1. Follow the extraction guide downloaded with the EM files. Place all of the files in /u01/software/em.
2, Setup the environment
export ORA_INVENTORY=/u01/app/oraInventory
export PDB_NAME=emrep
export SYS_PASSWORD=SysAdminpW1
export UNIX_GROUP_NAME=oinstall
export MW_HOME=${ORACLE_BASE}/middleware
export OMS_HOME=${MW_HOME}
export GC_INST=${ORACLE_BASE}/gc_inst
export AGENT_BASE=${ORACLE_BASE}/agent
export WLS_USERNAME=weblogic
export WLS_PASSWORD=SysAdminpW1
export SYSMAN_PASSWORD=${WLS_PASSWORD}
export AGENT_PASSWORD=${WLS_PASSWORD}
export SOFTWARE_LIBRARY=${ORACLE_BASE}/swlib
export DATABASE_HOSTNAME=localhost
export LISTENER_PORT=1521
export SOFTWARE_DIR=/u01/software/em
2. Change to the software directory and create a response file.
cat > /tmp/install.rsp <<EOF
RESPONSEFILE_VERSION=2.2.1.0.0
UNIX_GROUP_NAME=${UNIX_GROUP_NAME}
INVENTORY_LOCATION=${ORA_INVENTORY}
SECURITY_UPDATES_VIA_MYORACLESUPPORT=false
DECLINE_SECURITY_UPDATES=true
INSTALL_UPDATES_SELECTION=skip
ORACLE_MIDDLEWARE_HOME_LOCATION=${MW_HOME}
ORACLE_HOSTNAME=${ORACLE_HOSTNAME}
AGENT_BASE_DIR=${AGENT_BASE}
WLS_ADMIN_SERVER_USERNAME=${WLS_USERNAME}
WLS_ADMIN_SERVER_PASSWORD=${WLS_PASSWORD}
WLS_ADMIN_SERVER_CONFIRM_PASSWORD=${WLS_PASSWORD}
NODE_MANAGER_PASSWORD=${WLS_PASSWORD}
NODE_MANAGER_CONFIRM_PASSWORD=${WLS_PASSWORD}
ORACLE_INSTANCE_HOME_LOCATION=${GC_INST}
CONFIGURE_ORACLE_SOFTWARE_LIBRARY=true
SOFTWARE_LIBRARY_LOCATION=${SOFTWARE_LIBRARY}
DATABASE_HOSTNAME=${DATABASE_HOSTNAME}
LISTENER_PORT=${LISTENER_PORT}
SERVICENAME_OR_SID=${PDB_NAME}
SYS_PASSWORD=${SYS_PASSWORD}
SYSMAN_PASSWORD=${SYSMAN_PASSWORD}
SYSMAN_CONFIRM_PASSWORD=${SYSMAN_PASSWORD}
DEPLOYMENT_SIZE=SMALL
AGENT_REGISTRATION_PASSWORD=${AGENT_PASSWORD}
AGENT_REGISTRATION_CONFIRM_PASSWORD=${AGENT_PASSWORD}
PLUGIN_SELECTION={}
b_upgrade=false
EM_INSTALL_TYPE=NOSEED
CONFIGURATION_TYPE=LATER
CONFIGURE_SHARED_LOCATION_BIP=false
EOF
3. Run the installer.
./em13300_linux64.bin -silent -responseFile /tmp/install.rsp -J-Djava.io.tmpdir=/u01/tmp/
4. The the end of a successful install, run the root script.
sh ${MW_HOME}/allroot.sh
5. Create the the configuration response file..
cat > /tmp/config.rsp <<EOF
RESPONSEFILE_VERSION=2.2.1.0.0
UNIX_GROUP_NAME=${UNIX_GROUP_NAME}
INVENTORY_LOCATION=${ORA_INVENTORY}
SECURITY_UPDATES_VIA_MYORACLESUPPORT=false
DECLINE_SECURITY_UPDATES=true
INSTALL_UPDATES_SELECTION=skip
ORACLE_MIDDLEWARE_HOME_LOCATION=${MW_HOME}
ORACLE_HOSTNAME=${ORACLE_HOSTNAME}
AGENT_BASE_DIR=${AGENT_BASE}
WLS_ADMIN_SERVER_USERNAME=${WLS_USERNAME}
WLS_ADMIN_SERVER_PASSWORD=${WLS_PASSWORD}
WLS_ADMIN_SERVER_CONFIRM_PASSWORD=${WLS_PASSWORD}
NODE_MANAGER_PASSWORD=${WLS_PASSWORD}
NODE_MANAGER_CONFIRM_PASSWORD=${WLS_PASSWORD}
ORACLE_INSTANCE_HOME_LOCATION=${GC_INST}
CONFIGURE_ORACLE_SOFTWARE_LIBRARY=true
SOFTWARE_LIBRARY_LOCATION=${SOFTWARE_LIBRARY}
DATABASE_HOSTNAME=${DATABASE_HOSTNAME}
LISTENER_PORT=${LISTENER_PORT}
SERVICENAME_OR_SID=${PDB_NAME}
SYS_PASSWORD=${SYS_PASSWORD}
SYSMAN_PASSWORD=${SYSMAN_PASSWORD}
SYSMAN_CONFIRM_PASSWORD=${SYSMAN_PASSWORD}
DEPLOYMENT_SIZE=SMALL
AGENT_REGISTRATION_PASSWORD=${AGENT_PASSWORD}
AGENT_REGISTRATION_CONFIRM_PASSWORD=${AGENT_PASSWORD}
PLUGIN_SELECTION={}
b_upgrade=false
EM_INSTALL_TYPE=NOSEED
CONFIGURATION_TYPE=ADVANCED
CONFIGURE_SHARED_LOCATION_BIP=false
EOF
6. Run the configuration. This will take a very long time.
${MW_HOME}/sysman/install/ConfigureGC.sh -silent -responseFile /tmp/config.rsp
At the end of the installation you'll be provided a list of URLs and post-installation steps.
Oracle ORDS and Apache
Before using ORDS, you need a database and APEX. Go here to do that. Download ORDS at Oracle.
Installation of ORDS
The Oracle Rest Data Services (ORDS) installation consists of unzipping the downloaded archive, running the configuration command, then deploying. This setup is going to run ORDS in standalone mode with Apache HTTP to proxy requests.
As oracle user.
Download the ORDS zip to /tmp.
Extract the installer.
cd /tmp
mkdir -p /u01/ords
unzip ords-20.*.zip -d /u01/ords
Make a backup of the original properties file
mv /u01/ords/params/{ords_params.properties,ords_params.properties.orig}Create a ords_params.properties file.
cat > /u01/ords/params/ords_params.properties <<EOF
db.hostname=ora19c.core.example.com
db.port=1521
db.servicename=pdb1
db.sid=cdb1
db.username=APEX_PUBLIC_USER
db.password=Som3bTt3rpwd
migrate.apex.rest=false
plsql.gateway.add=true
rest.services.apex.add=true
rest.services.ords.add=true
schema.tablespace.default=SYSAUX
schema.tablespace.temp=TEMP
standalone.mode=true
standalone.use.https=true
standalone.http.port=8080
standalone.static.path=/home/oracle/apex/images
user.apex.listener.password=Som3bTt3rpwd
user.apex.restpublic.password=Som3bTt3rpwd
user.public.password=Som3bTt3rpwd
user.tablespace.default=APEX
user.tablespace.temp=TEMP
sys.user=SYS
sys.password=Som3bTt3rpwd
restEnabledSql.active=true
feature.sdw=true
database.api.enabled=true
EOF
Change to the ords directory and start the standalone instance.
cd /u01/ords
$JAVA_HOME/bin/java -jar ords.war standalone
Configuration of Apache httpd to map ORDS
The last step is to configure Apache to map HTTP-requests to ORDS and therefore APEX engine.
For this, add a custom httpd configuration file. By default, every .conf file placed in the etc/httpd/conf.d/ directory is read by httpd as an additional configuration file to the main /etc/httpd/conf/httpd.conf config file.
Create the apex.conf file in the etc/httpd/conf.d/ directory with the contents as below:
# proxy ORDS
<VirtualHost *:80>
    # ServerName example.com
    # ServerAlias www.example.com

    # alias for APEX static files
    Alias "/i" "/var/www/apex/images/"

    # uncomment the line below if you want
    # to redirect traffic to ORDS from root path
    # RedirectMatch permanent "^/$" "/ords"

    # proxy ORDS requests to tomcat
    ProxyRequests off
    <Location "/ords">
        ProxyPass "https://localhost:8443/ords"
        ProxyPassReverse "https://localhost:8443/ords"
    </Location>
</VirtualHost>
Tell SELinux (Yes, that should be running) to allow Apache to communicate to ORDS.
setsebool httpd_can_network_connect on
Oracle Response Files
Oracle Database Install
Creating a response file for a silent installation of Oracle Database is a common task that allows you to automate the installation process without needing to interact with the graphical user interface. Below is an example response file for installing Oracle Database 19c on a Linux system. Keep in mind that response files can significantly vary depending on the Oracle Database version and the specific configurations you need. Adjustments may be required to fit your particular environment and requirements.
This example assumes you're installing Oracle Database 19c with a typical installation type, which includes the creation of a general-purpose database. You'll need to replace placeholders (like <YOUR_VALUE_HERE>) with actual values relevant to your setup.
Create a file named db_install.rsp and include the following content:
[GENERAL]
oracle.install.responseFileVersion=/oracle/install/rspfmt_dbinstall_response_schema_v19.0.0
oracle.install.option=INSTALL_DB_SWONLY
ORACLE_HOSTNAME=<YOUR_HOSTNAME>
UNIX_GROUP_NAME=oinstall
INVENTORY_LOCATION=/u01/app/oraInventory
SELECTED_LANGUAGES=en
ORACLE_HOME=/u01/app/oracle/product/19.0.0/dbhome_1
ORACLE_BASE=/u01/app/oracle

[INSTALL]
nodelist=<YOUR_HOSTNAME>
oracle.install.db.InstallEdition=EE
oracle.install.db.OSDBA_GROUP=dba
oracle.install.db.OSOPER_GROUP=dba
oracle.install.db.OSBACKUPDBA_GROUP=dba
oracle.install.db.OSDGDBA_GROUP=dba
oracle.install.db.OSKMDBA_GROUP=dba
oracle.install.db.OSRACDBA_GROUP=dba
oracle.install.db.rootconfig.executeRootScript=true
oracle.install.db.config.starterdb.type=GENERAL_PURPOSE
oracle.install.db.config.starterdb.globalDBName=<YOUR_GLOBAL_DBNAME>
oracle.install.db.config.starterdb.SID=<YOUR_SID>
oracle.install.db.ConfigureAsContainerDB=false
oracle.install.db.config.PDBName=<YOUR_PDB_NAME>
oracle.install.db.config.starterdb.characterSet=<YOUR_CHARACTER_SET>
oracle.install.db.config.starterdb.memoryOption=true
oracle.install.db.config.starterdb.memoryLimit=<MEMORY_LIMIT_IN_MB>
oracle.install.db.config.starterdb.installExampleSchemas=false
oracle.install.db.config.starterdb.password.ALL=<YOUR_PASSWORD>
oracle.install.db.config.starterdb.storageType=FS
oracle.install.db.config.starterdb.dataLocation=/u01/oradata
oracle.install.db.config.starterdb.recoveryLocation=<YOUR_RECOVERY_LOCATION>
oracle.install.db.config.starterdb.enableSecuritySettings=true
oracle.install.db.config.starterdb.registerWithDirService=false
oracle.install.db.config.starterdb.listeners=<LISTENER_NAME>

[DELPHIX]
DELPHIX_DB_CONF=<DELPHIX_CONFIGURATION_OPTION>
Replace the placeholders with your specific configuration:
-
<YOUR_HOSTNAME>: The hostname of your server. -
<YOUR_GLOBAL_DBNAME>: The global database name. -
<YOUR_SID>: The system identifier for your database. -
<YOUR_PDB_NAME>: The pluggable database name, if you're using the multitenant architecture. -
<YOUR_CHARACTER_SET>: The character set for your database (e.g.,AL32UTF8). -
<MEMORY_LIMIT_IN_MB>: The memory limit for your database in megabytes. -
<YOUR_PASSWORD>: The password for SYS, SYSTEM, and other default administrative accounts. -
<YOUR_RECOVERY_LOCATION>: The path for the recovery area. -
<LISTENER_NAME>: The name of the Oracle Net listener. -
<DELPHIX_CONFIGURATION_OPTION>: Specific to your Delphix configuration, if applicable.
To run the Oracle Database installer silently using your response file, execute the following command from the directory where your Oracle Database installation files are located:
./runInstaller -silent -responseFile /path/to/db_install.rsp -ignorePrereqFailure
Replace /path/to/db_install.rsp with the actual path to your response file.
Important Notes:
- Ensure that all prerequisites for Oracle Database installation are met before running the installer, including any required packages, kernel parameters, and user and group configurations.
- The
-ignorePrereqFailureflag is optional and allows the installer to continue even if some prerequisites are not met. It's generally recommended to address all prerequisite checks for a production environment. - Running the root scripts (
/u01/app/oraInventory/orainstRoot.shand/u01/app/oracle/product/19.0.0/dbhome_1/root.sh) as the root user is typically required to complete the installation. The installer will prompt you for this if not included in the response file. - This example does not cover all possible configurations and options. Review the Oracle Database Installation Guide for your specific version and adjust the response file accordingly.
Database Creation
To create a new Oracle Database that includes a new Container Database (CDB) with a Pluggable Database (PDB), and to ensure that logs, archive logs, data files, and the Fast Recovery Area are on different volumes, you will use a response file tailored for the database creation process using the Database Configuration Assistant (DBCA).
The character set compatible with WebLogic SOA Suite RCU is typically AL32UTF8, as it supports Unicode and is widely used for applications requiring extensive character support.
Given the specifications, the response file will be crafted to meet the following requirements:
- Create a new CDB and PDB
- Allocate 6GB of RAM to the database and enable Automatic Memory Management
- Place logs, archive logs, data files, and the Fast Recovery Area on different volumes
- Use
AL32UTF8as the character set to ensure compatibility with WebLogic SOA Suite RCU
Below is an example response file template for creating a new Oracle CDB with a PDB. Please adjust paths and names to suit your environment.
[GENERAL]
responseFileVersion=/oracle/assistants/dbca/rspfmt_dbca.rsp
GDBNAME = "cdb1.example.com"
SID = "cdb1"
CREATEASCONTAINERDATABASE = true
NUMBEROFPDBS = 1
PDBNAME = "pdb1"
PDBADMINPASSWORD = "<Your_PDB_Admin_Password>"
TEMPLATENAME = "General_Purpose.dbc"
CHARACTERSET = "AL32UTF8"
NATIONALCHARACTERSET= "AL16UTF16"
DATABASETYPE = "MULTIPURPOSE"

[createDatabase]
gdbName = cdb1
sid = cdb1
createAsContainerDatabase=true
numberOfPDBs=1
pdbName=pdb1
templateName=General_Purpose.dbc
characterSet=AL32UTF8
nationalCharacterSet=AL16UTF16
databaseType=MULTIPURPOSE
automaticMemoryManagement=true
totalMemory=6000
storageType=FS
datafileDestination=/u02/oradata
recoveryAreaDestination=/u03/fast_recovery_area
redoLogFileSize=300
emConfiguration=NONE
listeners=LISTENER

[createContainerDatabase]
gdbName = cdb1
templateName = General_Purpose.dbc
sid = cdb1
createAsContainerDatabase = true
numberOfPDBs = 1
pdbName = pdb1
createPDBTemplate = "PDB Admin Managed Template"
pdbAdminUserName = admin
pdbAdminPassword = <Your_PDB_Admin_Password>
datafileDestination = /u02/oradata/cdb1/
recoveryAreaDestination = /u03/fast_recovery_area/cdb1/
storageType = FS

[CONFIGUREDATABASE]
LOGFILEDEST_1 = "/u04/logs/"
LOGFILEDEST_2 = "/u05/archive_logs/"
LOGFILEDEST_3 = "/u02/oradata/"
Replace <Your_PDB_Admin_Password> with a secure password for your PDB admin user.
Notes:
-
Paths:
/u02/oradata,/u03/fast_recovery_area,/u04/logs, and/u05/archive_logsshould be replaced with the actual mount points or directories you've set up on your system for data files, the Fast Recovery Area, logs, and archive logs, respectively. -
Total Memory: The
totalMemoryparameter is set to 6000, representing approximately 6GB of RAM dedicated to the Oracle instance. Oracle will manage this memory automatically becauseautomaticMemoryManagementis set to true. -
Character Sets:
CHARACTERSETis set toAL32UTF8, andNATIONALCHARACTERSETis set toAL16UTF16, which are suitable for globalized applications and compatibility with WebLogic SOA Suite RCU. -
Listeners: This template assumes a listener named
LISTENERis already configured on the default port (1521). Adjust as necessary for your environment.
Execution
To create the database using the response file, you would typically use the dbca command-line tool, specifying the response file with the -silent and -responseFile options:
dbca -silent -createDatabase -responseFile /path/to/your_response_file.rsp
Make sure to replace /path/to/your_response_file.rsp with the actual path to your response file.
Important: This response file template is provided as a starting point. You may need to adjust values and paths according to your specific Oracle Database version, system architecture, and requirements. Always review the Oracle Database documentation for the version you're installing to ensure compatibility and correctness.
Oracle XE and APEX on CentOS 7
Downloading the software
The first thing to do is download the software from Oracle Technology Network:
- Database Downloads - you will need the package for Linux x64 and the preinstall RPM package.
- Developer Tools/Oracle REST Data Services/Downloads
- Developer Tools/Application Express/Downloads
After the files have been downloaded, transfer them to the server.
Installation of RDBMS
After you checked them, to install the RDBMS, you need to install the preinstall RPM package first and then install the database software as following:
wget https://yum.oracle.com/repo/OracleLinux/OL7/latest/x86_64/getPackage/oracle-database-preinstall-18c-1.0-1.el7.x86_64.rpm
yum install oracle-database-preinstall-18c* -y
yum install oracle-database-xe-18c* -y
yum install httpd tomcat  -y
The user oracle and the group oinstallare created during the package installation. A default user environment is created during the set up process. You can set a password for this user by invoking passwd oracle command. This user is the owner of the /opt/oracle directory where the Oracle Database is located and this must stay unchanged.
chown oracle:oinstall /opt/oracleWhen the packages are installed and the user is set up, you need to run the initial database configuration script and answer all of the questions.
/etc/init.d/oracle-xe-18c configureAfter answering the questions it is going to take several minutes to initialize the database.
Setting up environment
Set up Oracle Database environment variables .
echo 'ORACLE_SID=XE' >> /etc/profile.d/oraenv.sh
echo 'ORAENV_ASK=NO' >> /etc/profile.d/oraenv.sh
echo '. /opt/oracle/product/18c/dbhomeXE/bin/oraenv -s' >> /etc/profile.d/oraenv.sh
. /etc/profile.d/oraenv.sh
Enable Oracle Database XE service for automatic startup:
systemctl enable oracle-xe-18cConnecting to database
And we are ready to log into the database.
sqlplus /nologCheck if everything is good.
-- connect to the database
sqlplus /nolog

-- change role
CONNECT SYS as SYSDBA

-- basic query to check everything came up right
select * from dual;

-- exit the database
exit
To make it easier to connect to the pluggable database, edit thetnsnames.ora file and add there a new connection descriptor
vim /opt/oracle/product/18c/dbhomeXE/network/admin/tnsnames.oraAdd the following after the standard XE record:
PDB1 =
  (DESCRIPTION =
    (ADDRESS = (PROTOCOL = TCP)(HOST = localhost)(PORT = 1521))
    (CONNECT_DATA =
      (SERVER = DEDICATED)
      (SERVICE_NAME = XEPDB1)
    )
  )
Installation of APEX
Change your directory back to /root, unzip the APEX archive and make the user oracle the owner of the directory. Considering we are installing the 19.2 version of APEX, it would look like this.
cd /root
mkdir -p /opt/oracle/apex
unzip apex_19.*.zip -d /opt/oracle
chown -R oracle:oinstall /opt/oracle/apex
Create an allow all ACL for APEX sql file in the APEX directory. This one is called apex_acl.sql.
BEGIN
  BEGIN
    dbms_network_acl_admin.drop_acl(acl => 'all-network-PUBLIC.xml');
  EXCEPTION
    WHEN OTHERS THEN
      NULL;
  END;
  dbms_network_acl_admin.create_acl(acl         => 'all-network-PUBLIC.xml',
                                    description => 'Allow all network traffic',
                                    principal   => 'PUBLIC',
                                    is_grant    => TRUE,
                                    privilege   => 'connect');
  dbms_network_acl_admin.add_privilege(acl       => 'all-network-PUBLIC.xml',
                                       principal => 'PUBLIC',
                                       is_grant  => TRUE,
                                       privilege => 'resolve');
  dbms_network_acl_admin.assign_acl(acl  => 'all-network-PUBLIC.xml',
                                    host => '*');
END;
/
sho err
COMMIT;
/
From the APEX directory connect to the pluggable database as sysdba and run the installation scripts.
cd /opt/oracle/apex
-- connect to the database
sqlplus /nolog

-- change role
CONN sys@pdb1 AS SYSDBA
-- run the script to install a full development environment
@apexins.sql SYSAUX SYSAUX TEMP /i/
-- create an instance administrator user and set their password
@apxchpwd.sql
-- unlock APEX public user
ALTER USER APEX_PUBLIC_USER ACCOUNT UNLOCK;
ALTER USER APEX_PUBLIC_USER IDENTIFIED BY "S0m3aw3s0m3Pw!";
-- configure REST Data Services
@apex_rest_config.sql
-- run the ACL setup
@apex_acl.sql
-- disconnect from the database
exitCopy APEX static files to the web server directory. They will be used to serve static images from the proxy.
mkdir -p /var/www/apex/images
cp -a /opt/oracle/apex/images/. /var/www/apex/images
The Application Express installation is complete.
Installation of ORDS
The Oracle Rest Data Services (ORDS) installation consists of unzipping the downloaded archive, running the configuration command, and then deploying the ords.war file into the Tomcat webapps folder.
cd /root
mkdir -p /opt/oracle/ords
unzip ords-19.*.zip -d /opt/oracle/ords
Run the ORDS configuration command with the advanced mode to run the interactive installation process.
cd /opt/oracle/ords
java -jar ords.war install advanced
When prompted for ORDS configuration directory, enter config.
Then provide the connection info to your pluggable database XEPDB1
Follow the on screen instructions.
After the configuration is completed, the values are saved in opt/oracle/ords/config/ords/defaults.xml file. It can be modified there. See more at Oracle Docs.
The tomcat user (created as part of Tomcat install) must have read-write access to the ORDS configuration folder:
chown -R tomcat:tomcat /opt/oracle/ords/configDeploy ORDS to Tomcat application server. Copy the ords.war into the Tomcat webapps directory for this
cp -a /opt/oracle/ords/ords.war /usr/share/tomcat/webapps/Done with ORDS and Tomcat, on to Apache.
Configuration of Apache httpd to map ORDS
The last step is to configure Apache to map HTTP-requests to ORDS and therefore APEX engine.
For this, add a custom httpd configuration file. By default, every .conf file placed in the etc/httpd/conf.d/ directory is read by httpd as an additional configuration file to the main /etc/httpd/conf/httpd.conf config file.
Create the apex.conf file in the etc/httpd/conf.d/ directory with the contents as below:
# forward ORDS tomcat
<VirtualHost *:80>
    # uncomment the lines below if you plan to serve different domains
    # on this web server, don't forget to change the domain name
    # ServerName yourdomain.tld
    # ServerAlias www.yourdomain.tld

    # alias for APEX static files
    Alias "/i" "/var/www/apex/images/"

    # uncomment the line below if you want
    # to redirect traffic to ORDS from root path
    # RedirectMatch permanent "^/$" "/ords"

    # proxy ORDS requests to tomcat
    ProxyRequests off
    <Location "/ords">
        ProxyPass "ajp://localhost:8009/ords"
        ProxyPassReverse "ajp://localhost:8009/ords"
    </Location>
</VirtualHost>
Tell SELinux (Yes, that should be running) to allow Apache to communicate to tomcat.
setsebool httpd_can_network_connect onNow you are ready to save the configuration file and restart the services.
systemctl restart httpd
systemctl restart tomcat
Open a few firewall ports. Yes, the the firewall should also be on.
firewall-cmd --permanent --add-service={http,https}
firewall-cmd --reload
And finally, access APEX from your web browser using a link like http://yourdomain.tld/ords (or http://yourdomain.tld in case you switched on force redirection), where yourdomain.tld is the domain name or the IP-address of your server.
Web Applications
BookStack on CentOS 7
BookStack is a simple, self-hosted, easy-to-use platform for sharing and storing information.
What you need:
Fresh install of CentOS 7 or other RHEL7 clone.
EPEL and IUS Community Project repositories.
Add the repositories
yum -y install epel-release
yum -y install https://centos7.iuscommunity.org/ius-release.rpm
Update the system and install the packages
yum update -y && reboot
yum -y install git mariadb101u-server nginx php72u php72u-cli php72u-fpm php72u-gd php72u-json php72u-mbstring php72u-mysqlnd php72u-openssl php72u-tidy php72u-tokenizer php72u-xml php72u-ldap
Start and secure MySQL
systemctl restart mariadb.service   # Start MySQL service
mysql_secure_installation   # Set root password
mysql -u root -p   # Enter root password
Create database and user
CREATE DATABASE IF NOT EXISTS bookstackdb DEFAULT CHARACTER SET utf8 COLLATE utf8_general_ci;
GRANT ALL PRIVILEGES ON bookstackdb.* TO 'bookstackuser'@'localhost' IDENTIFIED BY 'YourAwesomePassword' WITH GRANT OPTION;
FLUSH PRIVILEGES;
quit
Configure Nginx
Update SOCKS permissions for php-fpm
Update /etc/php-fpm.d/www.conf configuration. Look for and update the following settings.
listen = /var/run/php-fpm.sock
listen.owner = nginx ; SOCKS permission
listen.group = nginx ; SOCKS permission
listen.mode = 0660 ; SOCKS permission
user = nginx ; PHP-FPM running user
group = nginx ; PHP-FPM running group
php_value[session.save_path]    = /var/www/sessions
Backup original Nginx configuration file
mv /etc/nginx/nginx.conf /etc/nginx/nginx.conf.orig\
Create a new config file
vim /etc/nginx/nginx.conf
user nginx;
worker_processes auto;
error_log /var/log/nginx/error.log;
pid /run/nginx.pid;

include /usr/share/nginx/modules/*.conf;

events {
    worker_connections 1024;
}

http {
    log_format  main  '$remote_addr - $remote_user [$time_local] "$request" '
                      '$status $body_bytes_sent "$http_referer" '
                      '"$http_user_agent" "$http_x_forwarded_for"';

    access_log  /var/log/nginx/access.log  main;

    sendfile            on;
    tcp_nopush          on;
    tcp_nodelay         on;
    keepalive_timeout   65;
    types_hash_max_size 2048;

    include             /etc/nginx/mime.types;
    default_type        application/octet-stream;

    include /etc/nginx/conf.d/*.conf;
}
Bookstack configuration
vim /etc/nginx/conf.d/bookstack.conf
server {
  listen 80;
  server_name localhost;
  root /var/www/BookStack/public;

  access_log  /var/log/nginx/bookstack_access.log;
  error_log  /var/log/nginx/bookstack_error.log;

  client_max_body_size 1G;
  fastcgi_buffers 64 4K;

  index  index.php;

  location / {
    try_files $uri $uri/ /index.php?$query_string;
  }

  location ~ ^/(?:\.htaccess|data|config|db_structure\.xml|README) {
    deny all;
  }

  location ~ \.php(?:$|/) {
    fastcgi_split_path_info ^(.+\.php)(/.+)$;
    include fastcgi_params;
    fastcgi_param SCRIPT_FILENAME $document_root$fastcgi_script_name;
    fastcgi_param PATH_INFO $fastcgi_path_info;
    fastcgi_pass unix:/var/run/php-fpm.sock;
  }

  location ~* \.(?:jpg|jpeg|gif|bmp|ico|png|css|js|swf)$ {
    expires 30d;
    access_log off;
  }
}
Setting up composer
cd /usr/local/bin   # Enter the directory where composer will be installed
curl -sS https://getcomposer.org/installer | php   # Install composer
mv composer.phar composer   # Rename composer
Download BookStack code
cd /var/www   # Change to where BookStack will be installed
mkdir /var/www/sessions   # Create php sessions directory
git clone https://github.com/BookStackApp/BookStack.git --branch release --single-branch   # Clone the latest from the release branch
cd BookStack && composer install   # Change to the BookStack directory, and let composer do the rest
Create the .env file
Update the database settings. The rest of the parameters are safe defaults. A sample is available here:
cp .env.example .env   # Copy the example config
vim .env   # Update the new config with database.
Set permissions and generate the database. You should still be in the BookStack directory.
php artisan key:generate --force   # Generate and update APP_KEY
chown -R nginx:nginx /var/www/{BookStack,sessions}   # Change ownership to the webserver
php artisan migrate --force   # Generate database tables
Setup Let's Encrypt
yum install -y certbot-nginx # Install certbot
certbot --nginx -d books.clusterapps.com # Run certbot. Follow the prompts.
Final cleanup
firewall-cmd --permanent --add-service={http,https}
systemctl enable nginx.service mariadb.service php-fpm.service
systemctl reboot
Once the system has finished booting, open a browser and head to https://your.url
Evergreen ILS on Ubuntu 18.04
Evergreen is highly-scalable software for libraries that helps library patrons find library materials, and helps libraries manage, catalog, and circulate those materials, no matter how large or complex the libraries.
Evergreen is open source software, licensed under the GNU GPL, version 2 or later.
Learn more here. This guide will be on an Ubuntu 18.04 server.
Some reference for the installation
-
The user Linux account is the account that you use to log onto the Linux system as a regular user.
-
The root Linux account is an account that has system administrator privileges. Look for # on the console. Sometimes
sudowill be used to run single commands as the root user. -
The opensrf Linux account is an account that you will create as part of installing OpenSRF.
- The minimum supported version of OpenSRF is 3.0.0.
-
PostgreSQL is required The minimum supported version is 9.4.
- The postgres Linux account is created automatically when you install the PostgreSQL database server.
- The evergreen PostgreSQL account is a superuser that you will create to connect to the database server.
- The egadmin Evergreen account is an administrator account for Evergreen.
-
OpenSRF
First download and unpack the OpenSRF source as the Linux user.
wget https://evergreen-ils.org/downloads/opensrf-3.1.0.tar.gz
tar -xvf opensrf-3.1.0.tar.gz
cd opensrf-3.1.0/
Issue the following commands from the opensrf folder as the root Linux account to install prerequisites.
sudo apt-get install make
sudo make -f src/extras/Makefile.install ubuntu-bionic
As the Linux user, use the configure command to configure OpenSRF, and the make command to build OpenSRF. The default installation prefix (PREFIX) for OpenSRF is /opensrf/.
./configure --prefix=/openils --sysconfdir=/openils/conf
make
If there were no build errors, then as root run the make install.
sudo make installCreate the opensrf user as the root user.
sudo useradd -m -s /bin/bash opensrf
sudo su -c 'echo "export PATH=\$PATH:/openils/bin" >> /home/opensrf/.bashrc'
sudo passwd opensrf
sudo chown -R opensrf:opensrf /openils
Define your public and private OpenSRF domains.
This is a single server setup so the /etc/hosts file will be used to add the public and private addresses.
Use the root user to add the following to /etc/hosts file.
127.0.1.2       public.localhost        public
127.0.1.3       private.localhost       private
Adjusting the system dynamic library path.
sudo su -c 'echo /openils/lib > /etc/ld.so.conf.d/opensrf.conf'
sudo ldconfig
OpenSRF requires an XMPP (Jabber) server. The ejabberd packages will be used.
First stop the existing service.
sudo systemctl stop ejabberd.serviceOpen /etc/ejabberd/ejabberd.yml and make the following changes as the root user:
If you don't want to edit this file, download a preconfigured one from here
-
Define your public and private domains in the
hostsdirective. For example:hosts: - "localhost" - "private.localhost" - "public.localhost"
-
Change
starttls_requiredto false -
Change
auth_password_formatto plain -
Change
shaper:normalandfastvalues to 500000 -
Increase the
max_user_sessions:all:value to 10000 -
Comment out the
mod_offlinedirective##mod_offline: ##access_max_user_messages: max_user_offline_messages -
Uncomment the
mod_legacy_authdirective
Or use the downloaded file.
sudo mv /etc/ejabberd/{ejabberd.yml,ejabberd.yml.org}
sudo wget -O /etc/ejabberd/ejabberd.yml https://git.clusterapps.com/snippets/6/raw
Start the ejabberd server:
sudo systemctl start ejabberd.serviceOn each domain, you need two Jabber users to manage the OpenSRF communications:
-
a
routeruser, to whom all requests to connect to an OpenSRF service will be routed; this Jabber user must be namedrouter -
an
opensrfuser, which clients use to connect to OpenSRF services; this user can be named anything.
sudo ejabberdctl register router private.localhost UseARealPasswordNotthisone
sudo ejabberdctl register opensrf private.localhost UseARealPasswordNotthisone
sudo ejabberdctl register router public.localhost UseARealPasswordNotthisone
sudo ejabberdctl register opensrf public.localhost UseARealPasswordNotthisone
As the opensrf Linux account, copy the example configuration files to create your locally OpenSRF configuration.
sudo su - opensrf
cd /openils/conf
cp opensrf_core.xml.example opensrf_core.xml
cp opensrf.xml.example opensrf.xml
Edit opensrf_core.xml file to update the username / password pairs to match the Jabber user accounts you created.
-
<config><opensrf>= use the private Jabberopensrfuser -
<config><gateway>= use the public Jabberopensrfuser -
<config><routers><router>= use the public Jabberrouteruser -
<config><routers><router>= use the private Jabberrouteruser
Enable the opensrf Linux account to use srfsh as the opensrf user.
cp /openils/conf/srfsh.xml.example /home/opensrf/.srfsh.xmlUpdate the password to match the password you set for the Jabber opensrf user at the private.localhost domain.
vim /home/opensrf/.srfsh.xmlStart all OpenSRF services as the opensrf Linux account.
osrf_control --localhost --start-all-
Start the
srfshinteractive OpenSRF shell by issuing the following command as the opensrf Linux account:Starting thesrfshinteractive OpenSRF shellsrfsh
-
Issue the following request to test the
opensrf.mathservice:srfsh# request opensrf.math add 2,2
You should receive the value
4.
Install WebSockets as the root user.
apt-get install git-core
cd /tmp
git clone https://github.com/disconnect/apache-websocket
cd apache-websocket
apxs2 -i -a -c mod_websocket.c
Create the websocket Apache instance
sh /usr/share/doc/apache2/examples/setup-instance websocketsRemove from the main apache instance
a2dismod websocketChange to the directory into which you unpacked OpenSRF, then copy config files.
cp examples/apache_24/websockets/apache2.conf /etc/apache2-websockets/Add configuration variables to the end of /etc/apache2-websockets/envvars.
export OSRF_WEBSOCKET_IDLE_TIMEOUT=120
export OSRF_WEBSOCKET_IDLE_CHECK_INTERVAL=5
export OSRF_WEBSOCKET_CONFIG_FILE=/openils/conf/opensrf_core.xml
export OSRF_WEBSOCKET_CONFIG_CTXT=gateway
export OSRF_WEBSOCKET_MAX_REQUEST_WAIT_TIME=600
Before you can start websockets, you must install a valid SSL certificate in /etc/apache2/ssl/.
Evergreen application
Download and extract the archive as the Linux user.
wget https://evergreen-ils.org/downloads/Evergreen-ILS-3.3.0.tar.gz
tar -xvf Evergreen-ILS-3.3.0.tar.gz
cd Evergreen-ILS-3.3.0/
Issue the following commands as the root Linux account to install prerequisites using the Makefile.install prerequisite installer
make -f Open-ILS/src/extras/Makefile.install ubuntu-bionicFrom the Evergreen source directory, issue the following commands as the user Linux account to configure and build Evergreen:
PATH=/openils/bin:$PATH ./configure --prefix=/openils --sysconfdir=/openils/conf
make
Issue the following command as the root Linux account to install Evergreen
sudo make installChange ownership of the Evergreen files
sudo chown -R opensrf:opensrf /openilsRun ldconfig as the root Linux account.
sudo ldconfigIssue the following commands as the root Linux account to copy the Apache configuration files from the Evergreen source archive.
sudo cp Open-ILS/examples/apache_24/eg_24.conf /etc/apache2/sites-available/eg.conf
sudo cp Open-ILS/examples/apache_24/eg_vhost_24.conf /etc/apache2/eg_vhost.conf
sudo cp Open-ILS/examples/apache_24/eg_startup /etc/apache2/
As the root Linux account, edit the eg.conf file that you copied.
To enable access to the offline upload / execute interface from any workstation on any network, make the following change (and note that you must secure this for a production instance):
-
Replace
Require host 10.0.0.0/8withRequire all granted
As the root Linux account, edit /etc/apache2/envvars. Change export APACHE_RUN_USER=www-data to export APACHE_RUN_USER=opensrf.
As root edit /etc/apache2/apache2.conf and make the following changes.
sudo vim /etc/apache2/apache2.conf-
Change
KeepAliveTimeoutto1. -
Change
MaxKeepAliveRequeststo100.
As the root Linux account, configure the prefork module to start and keep enough Apache servers available to provide quick responses to clients.
sudo vim /etc/apache2/mods-available/mpm_prefork.conf<IfModule mpm_prefork_module>
StartServers 15
MinSpareServers 5
MaxSpareServers 15
MaxRequestWorkers 75
MaxConnectionsPerChild 500
</IfModule>As the root user, enable the mpm_prefork module:
sudo a2dismod mpm_event
sudo a2enmod mpm_prefork
As the root Linux account, enable the Evergreen site:
sudo a2dissite 000-default
sudo a2ensite eg.conf
As the root Linux account, enable Apache to write to the lock directory
sudo chown opensrf /var/lock/apache2To configure OpenSRF for Evergreen, issue the following commands as the opensrf Linux account. (Yes you did edit these files earlier but now there are more settings)
cp -b /openils/conf/opensrf_core.xml.example /openils/conf/opensrf_core.xml
cp -b /openils/conf/opensrf.xml.example /openils/conf/opensrf.xml
Edited the opensrf_core.xml as the opensrf user and enter the same passwords from the OpenSRF install steps.
To enable the default set of hooks, issue the following command as the opensrf Linux account:
cp -b /openils/conf/action_trigger_filters.json.example /openils/conf/action_trigger_filters.jsonEvergreen database
In production environments, this would be on a dedicated server or cluster. For this deployment the database will be on the same server. If you are serious about your setup you would never install the application and the database on the same server. This is for testing only. For the best performance, run PostgreSQL on RHEL or Solaris.
Installing PostgreSQL server packages as root. Use the Makefile provided in the Evergreen archive.
sudo make -f Open-ILS/src/extras/Makefile.install postgres-server-ubuntu-bionicIssue the following command as the postgres Linux account to create a new PostgreSQL superuser named evergreen.
sudo su - postgres
createuser -s -P evergreen
Issue the following command as the root Linux account from inside the Evergreen source directory, replacing <user>, <password>, <hostname>, <port>, and <dbname> with the appropriate values for your PostgreSQL database (where <user> and <password> are for the evergreen PostgreSQL account you just created), and replace <admin-user> and <admin-pass> with the values you want for the egadmin Evergreen administrator account:
perl Open-ILS/src/support-scripts/eg_db_config --update-config \
 --service all --create-database --create-schema --create-offline \
 --user <user> --password <password> --hostname <hostname> --port <port> \
 --database <dbname> --admin-user <admin-user> --admin-pass <admin-pass>
If you add the --load-all-sample parameter to the eg_db_config command, a set of authority and bibliographic records, call numbers, copies, staff and regular users, and transactions will be loaded into your target database. This sample dataset is commonly referred to as the concerto sample data, and can be useful for testing out Evergreen functionality and for creating problem reports that developers can easily recreate with their own copy of the concerto sample data.
Starting Evergreen
Start the memcached and ejabberd services
sudo systemctl enable --now ejabberd
sudo systemctl enable --now memcached
As the opensrf Linux account, start Evergreen. The -l flag in the following command is only necessary if you want to force Evergreen to treat the hostname as localhost;
osrf_control -l --start-allif you configured opensrf.xml using the real hostname of your machine as returned by perl -ENet::Domain 'print Net::Domain::hostfqdn() . "\n";', you should not use the -l flag. In a multi server setup, do not use localhost.
As the opensrf Linux account, generate the Web files needed by the web staff client and catalogue and update the organization unit proximity. Do this the first time you start Evergreen, and after that each time you change the library org unit configuration.
autogen.shAs the root Linux account, restart the Apache Web server:
systemctl restart apache2Testing connections
Once you have installed and started Evergreen, test your connection to Evergreen via srfsh.
As the opensrf Linux account. <admin-user> <admin-pass> are the egadmin username and password created earlier.
/openils/bin/srfsh
srfsh% login <admin-user> <admin-pass>
The output should look like this:
#########################################
Received Data: "$2a$10$londKQogYvvF71H92Wwpme"
------------------------------------
Request Completed Successfully
Request Time in seconds: 0.052501
------------------------------------
Received Data: {
"ilsevent":0,
"textcode":"SUCCESS",
"desc":"Success",
"pid":32474,
"stacktrace":"oils_auth.c:636",
"payload":{
"authtoken":"bd4f67a646ee4c39e923a272dc6c79a3",
"authtime":420
}
}
------------------------------------
Request Completed Successfully
Request Time in seconds: 0.171812
------------------------------------
Login Session: bd4f67a646ee4c39e923a272dc6c79a3. Session timeout: 420.000000
#########################################
Matomo on CentOS 7
Installing Matomo
Matomo, formerly known as Piwik, is an open source web analytics application. It rivals Google Analytics and includes even more features and allows you to brand your brand and send out custom daily, weekly, and monthly reports to your clients.
First let’s start by ensuring your system is up-to-date and has the needed repositories.
yum -y install epel-release
yum -y install https://centos7.iuscommunity.org/ius-release.rpm
yum clean all
yum -y update
reboot # if kernel updated
Install needed packages
yum -y install wget mariadb mariadb-server mysql httpd openssl mod_ssl php72u-json mod_php72u php72u-gd php72u-imap php72u-ldap php72u-odbc pear1u php72u-xml php72u-xmlrpc php72u-mbstring php72u-mysqlnd php72u-snmp php72u-soap php72u-tidy curl curl-devel mcrypt
Configure MySQL
systemctl restart mariadb.service   # Start MySQL service
mysql_secure_installation   # Set root password
mysql -u root -p   # Enter root password
Add the database and user.
CREATE DATABASE IF NOT EXISTS matomodb DEFAULT CHARACTER SET utf8 COLLATE utf8_general_ci;
GRANT ALL PRIVILEGES ON matomodb.* TO 'matomouser'@'localhost' IDENTIFIED BY 'YourAwesomePassword' WITH GRANT OPTION;
FLUSH PRIVILEGES;
quit
Installing Matomo on CentOS 7.
cd /var/www
wget https://builds.matomo.org/piwik.zip
Unpack the Matomo archive to the document root directory on your server.
unzip piwik.zip -d /var/www/html/
mv /var/www/html/piwik/ /var/www/html/matomo/
Update owner on Matomo files and folders
chown -R apache:apache /var/www/html/matomo
Configure Apache
Create Apache virtual host for Matomo . First create ‘/etc/httpd/conf.d/vhosts.conf’ file
vim /etc/httpd/conf.d/vhosts.conf
IncludeOptional vhosts.d/*.confCreate the virtual host.
mkdir /etc/httpd/vhosts.d/
vim /etc/httpd/vhosts.d/yourdomain.com.conf
Add the following to the new vhost config.
<VirtualHost YOUR_SERVER_IP:80>
ServerAdmin webmaster@yourdomain.com
DocumentRoot /var/www/html/matomo
ServerName yourdomain.com
ServerAlias www.yourdomain.com
ErrorLog "/var/log/httpd/yourdomain.com-error_log"
CustomLog "/var/log/httpd/yourdomain.com-access_log" combined

<Directory "/var/www/html/matomo/">
DirectoryIndex index.html index.php
Options FollowSymLinks
AllowOverride All
Require all granted
</Directory>
</VirtualHost>
Start Apache
systemctl start httpdVerify that Apache is running by checking the status of the service:
systemctl status httpdInstall certbot to handle SSL
yum install -y mod_ssl python-certbot-apacheRun Certbot to secure the Apache site
certbot --apache -d site.example.comEnable services and reboot the server and make sure it works.
systemctl enable httpd mariadb
reboot
Browse to https://your.sitename.com and follow the Matomo setup steps.
For details see https://matomo.org/docs/installation/
Installing libmaxminddb
Install git and PHP development libraries.
yum -y install php72u-devel git automake autoconf libtoolTo install the library you need to download it’s latest tar ball and extract it, or clone their git repository
git clone --recursive https://github.com/maxmind/libmaxminddbWhen cloning from git, run ./bootstrap from the libmaxminddb directory and then run the commands.
./configure
make
sudo make install
sudo ldconfig
You can find more details about installing the library in their README
Installing Extension
After successfully installing libmaxmindb, you need to download or checkout MaxMind-DB-Reader-php.
Then run the following commands from the top-level directory of this distribution:
cd ext
phpize
./configure
make
sudo make install
You then must load your extension. The recommend method is to add the following to your php.ini file:
extension=maxminddb.so
Now restart the webserver and the GeoIP 2 PHP provider should mention if the extension is loaded in Matomo (Piwik) > Settings > Geolocation.
Note: You may need to install the PHP development package on your OS such as php5-dev for Debian-based systems or php-devel for RedHat/Fedora-based ones.
If after installing, you receive an error that libmaxminddb.so.0 is missing you may need to add the lib directory in your prefix to your library path. On most Linux distributions when using the default prefix (/usr/local), you can do this by running the following commands:
echo /usr/local/lib  >> /etc/ld.so.conf.d/local.conf
ldconfig
Download the GeoIP database and copy it to Matomo’s path/to/matomo/misc/ subdirectory.
wget https://geolite.maxmind.com/download/geoip/database/GeoLite2-City.tar.gz
cp GeoLite2-City_20190312/GeoLite2-City.mmdb /path/to/matomo/misc/mod_GeoIP on CentOS 7
Mod_GeoIP is an Apache module that can be used to get the geographic location of IP address of the visitor into the Apache web server. The module allows you to determine the visitor’s country and location. It is specially useful for Geo Ad Serving, Target Content, Spam Fighting, Fraud Detection, Redirecting/Blocking visitors based on their country and much more.
GeoIP module allows system administrators to redirect or block web traffic according on the client geographical location. The geographical location is learned via client IP address.
Mod_GeoIP has two versions, one is Free and another one is Paid.
Enable EPEL Repository
Mod_Geoip is not available under official repository, install and enable third party EPEL repository.
yum install epel-releaseInstall Mod_GeoIP
Once you’ve EPEL repository enabled on your system, you can simple install mod_geoip by running following command with their dependency packages.
yum install mod_geoip GeoIP GeoIP-devel GeoIP-data zlib-develDownload latest Geo Databases
It’s good idea to download latest Geo City and Country Database to stay updated.
cd /usr/share/GeoIP/
mv GeoIP.dat GeoIP.dat_org
wget http://geolite.maxmind.com/download/geoip/database/GeoLite2-Country.tar.gz
wget http://geolite.maxmind.com/download/geoip/database/GeoLite2-City.tar.gz
gunzip GeoLite2-Country.tar.gz
gunzip GeoLite2-City.tar.gz
Enable Mod_GeoIP in Apache
After the module has been installed, open and edit the module main configuration file, with a command line text editor such as vim, and activate the module server-wide, as illustrated in the below excerpt.
vim /etc/httpd/conf.d/geoip.confSet the line GeoIPEnable from Off to On. Also, make sure you add the absolute path to GeoIP database file.
<IfModule mod_geoip.c>
GeoIPEnable On
GeoIPDBFile /usr/share/GeoIP/GeoIP.dat MemoryCache
</IfModule>
Restart the Apache service to reflect changes.
systemctl restart httpdIf you are running multiple sites, It’s not recommended to turn on GeoIP module server-wide. You should enable the GeoIP module only in <Location> or <Directory> blocks where you would actually perform the traffic redirection or block.
Updating GeoIP Database
GeoIP database is updated beginning of every month. So, its is very important to keep GeoIP database up-to-date. To download latest version of database use the following command.
cd /usr/share/GeoIP/
mv GeoIP.dat GeoIP.dat_org
wget http://geolite.maxmind.com/download/geoip/database/GeoLite2-Country.tar.gz
wget http://geolite.maxmind.com/download/geoip/database/GeoLite2-City.tar.gz
gunzip GeoLite2-Country.tar.gz
gunzip GeoLite2-City.tar.gz
For more information about mod_geoip and its usage can be found at http://www.maxmind.com/app/mod_geoip.
XCP-ng / Citrix Hypervisor
Check boot filesystem
To check the file system of a Citrix XenServer Host, complete the following procedure:
-
Insert the installation CD 1 of the XenServer host into CD-ROM drive where the file system to check is located.
-
Start the installation process and stop when it displays the Confirm Installation dialog box and to click Install XenServer. From the message displayed in the dialog box, note the path for the disk. For example: "Please confirm you wish to proceed: all data on disk /dev/sda will be destroyed."
-
Press ALT + F2 (you can toggle between the installation screen and the command prompt using ALT + F1 and ALT + F2). It prompts you to log on. Log on as the root user and the following prompt is displayed:
[root@(none)~]# -
Run the fsck command as follows:
[root@(none)~]# fsck /dev/sda1 - reboot
Generate SSL Certificates
Clear the “request was aborted:Could not create ssl/tls secure channel” error.
Issue:
The generated SSL cert on the pool master isn’t good enough for Windows 10.
Fix:
Make a new certificate.
Modify the shell script /opt/xensource/libexec/generate_ssl_cert and find the section that reads:
openssl genrsa > privkey.rsa
openssl req -batch -new -x509 -key privkey.rsa -days 3650 -config config -out cert.csr
openssl dhparam 512 > dh.pem
Change it to the following:
openssl genrsa 1024 > privkey.rsa
openssl req -batch -new -x509 -key privkey.rsa -days 3650 -config config -out cert.csr
openssl dhparam 1024 > dh.pem
Run the following commands
mv /etc/xensource/xapi-ssl.pem /etc/xensource/xapi-ssl.pem.bak
/opt/xensource/libexec/generate_ssl_cert "/etc/xensource/xapi-ssl.pem" $(hostname -f)
xe-toolstack-restart
You should see it generating 1024 bit keys.
A reboot might be needed.
Install - Network
Requirements
The PXE server requires a Dynamic Host Configuration Protocol (DHCP) server to provide IP addresses to the PXE-booting systems, and either an NFS, FTP, or an HTTP server to house the installation files. Files can all co-exist on the same server, or be distributed on different servers on the network. Each XCP host needs a PXE boot-enabled Ethernet card.
TFTP setup: For tips on installing a TFTP server see Tech Notes.
A copy of the extracted ISO file should be accessible by the host via http. This path could also be used for rolling pool upgrades. See Tech notes for additional steps and features for configuring local repositories.
PXELinux
Add an XCP entry into pxelinux.cfg/default
LABEL xcp
MENU LABEL XCP-ng
KERNEL mboot.c32
APPEND xcp/xen.gz dom0_max_vcpus=1-2 dom0_mem=1024M,max:1024M com1=115200,8n1 console=com1,vga --- xcp/vmlinuz xencons=hvc console=hvc0 console=tty0 install --- xcp/install.img
Copy the files mboot.c32 from /usr/lib/syslinux to the /var/lib//tftboot directory.
Copy the files install.img, vmlinuz*, and all files in the boot directory from the installation CD to /var/lib/tftpboot/xcp.
The xcp directory should look simalar to this:
xcp/					<- Most of these files come from /boot on the .iso
├── efiboot.img
├── gcdx64.efi
├── grubx64.efi
├── install.img			<- This is /install.img on the .iso
├── isolinux
│   ├── boot.cat
│   ├── isolinux.bin
│   ├── isolinux.cfg
│   ├── mboot.c32		<- From /boot/pxelinux on the iso
│   ├── memtest
│   ├── menu.c32		<- From /boot/pxelinux on the iso
│   ├── pg_help
│   ├── pg_main
│   └── splash.lss
├── vmlinuz
└── xen.gz
Answer files
The Answerfile documentation is lacking at the Citrix website. Somethings you'll just have to experiment with.
A simple Answerfile.
<?xml version="1.0"?>
<installation>
    <keymap>en-us</keymap>
    <primary-disk>sda</primary-disk>
    <guest-disk>sdb</guest-disk>
    <root-password>StrongPassword</root-password>
    <source type="url">http://fqdn-or-ip/xcp/76/</source>
    <admin-interface name="eth0" proto="dhcp" />
    <timezone>America/New_York</timezone>
</installation>
Install - Physical Media
XenServer installation overview.
All hosts have at least one IP address associated with them. To configure a static IP address for the host (instead of using DHCP), have the static IP address and hostname on hand before beginning this procedure.
To install the XenServer host:
- Burn the installation files for XenServer to a CD or use a USB boot drive
- Back up data you want to preserve. Installing XenServer overwrites data on any hard drives that you select to use for the installation.
- Insert the installation CD into the DVD drive of the host computer.
- Restart the host computer.
- Boot from the DVD drive or USB
- Following the initial boot messages
- Select Ok to do a clean installation.
- If you have multiple hard disks, choose a Primary Disk for the installation. Select Ok.
Choose which disks you want to use for virtual machine storage. Choose Ok.
- Set up the management interface to use to connect to XenCenter.
- Configure the Management NIC IP address with a static IP address
- Specify the hostname and the DNS configuration
- Follow the remaining installation screens
- Select Install XenServer.
- From the Installation Complete screen, eject the installation CD from the drive, and then select *Ok to reboot the server.
- Finish configuration using XenCenter
- Apply latest patches
- Create new pool
- Configure Networking
- Join other nodes to pool
Networking
Command line tools for XenServer host networking.
Master
Slave
Reset slave host networking
xe-reset-networking --mode= static --ip=$ip --netmask=$mask --gateway=$gateway --dns=$dns --master=$masteripPool
Storage Repositories
New local SR
xe sr-create host-uuid=<uuid> content-type=user name-label="<name>" \ shared=false device-config:device="</dev/disk/by-id/device>" type=ext
Fixes
Fix the Command not permitted while global/metadata_read_only is set message when removing lvm partitions or pv.
pvremove /dev/sda --config global{metadata_read_only=0}
VM Networking
Change Network
xe vm-list
Copy the uuid for the VM you want to remove the interface.xe vif-list vm-uuid=<vm-uuid>
Copy the uuid for the vif you want to destroy.xe vif-destroy uuid=<vif-uuid>
Note you will need to know which device you want to remove if there is more than one interface attached to the VM.
Add:
xe network-list ( "name-label=<label>" )
Copy the networks uuid.xe vif-create network-uuid=<network-uuid> vm-uuid=<vm-uuid> device=0
Assign IP addressing to VM
xe vm-param-set uuid=8bc00eab-9f3e-4e9c-c7bb-f01dfabc758d xenstore-data:vm-data/ip=10.10.0.89 xenstore-data:vm-data/netmask=255.255.255.0 xenstore-data:vm-data/gateway=10.10.0.2 xenstore-data:vm-data/dns=10.10.0.3
ZFS
If you do this, you will break something. DO NOT run production on this SR. If you do, I hope you trust your backups.
Install/enable ZFS on your hosts
On each host that you want to run ZFS:
yum install --enablerepo="xcp-ng-extras" blktap vhd-tool
Install ZFS packages built for XCP-ng: (check version)
yum install --enablerepo="xcp-ng-extras" kmod-spl-4.4.0+10 kmod-zfs-4.4.0+10 spl zfs
Enable the module with
depmod -a && modprobe zfs.
Create a new ZFS pool:
Create the new SR.
Disable sync.
zfs set sync=disabled tank